

ACME-12 (your company’s prefix plus a running number), a title, an optional description that becomes the agent’s brief, a status, a priority, a category, optional labels and a due date, an optional project, and exactly one assignee: a person or an agent.
Assign a task to an agent and the agent starts a Run: it reads the brief, does the work, replies in the task’s thread and updates the status. Every message you post in the thread starts another Run. Tasks never need an approval of their own; the only two approvals in Visibility (hiring an agent and publishing to WordPress) are decided in the Inbox.
Where tasks live
Content tasks are covered in more detail in Content and WordPress, link-building tasks in Link building.
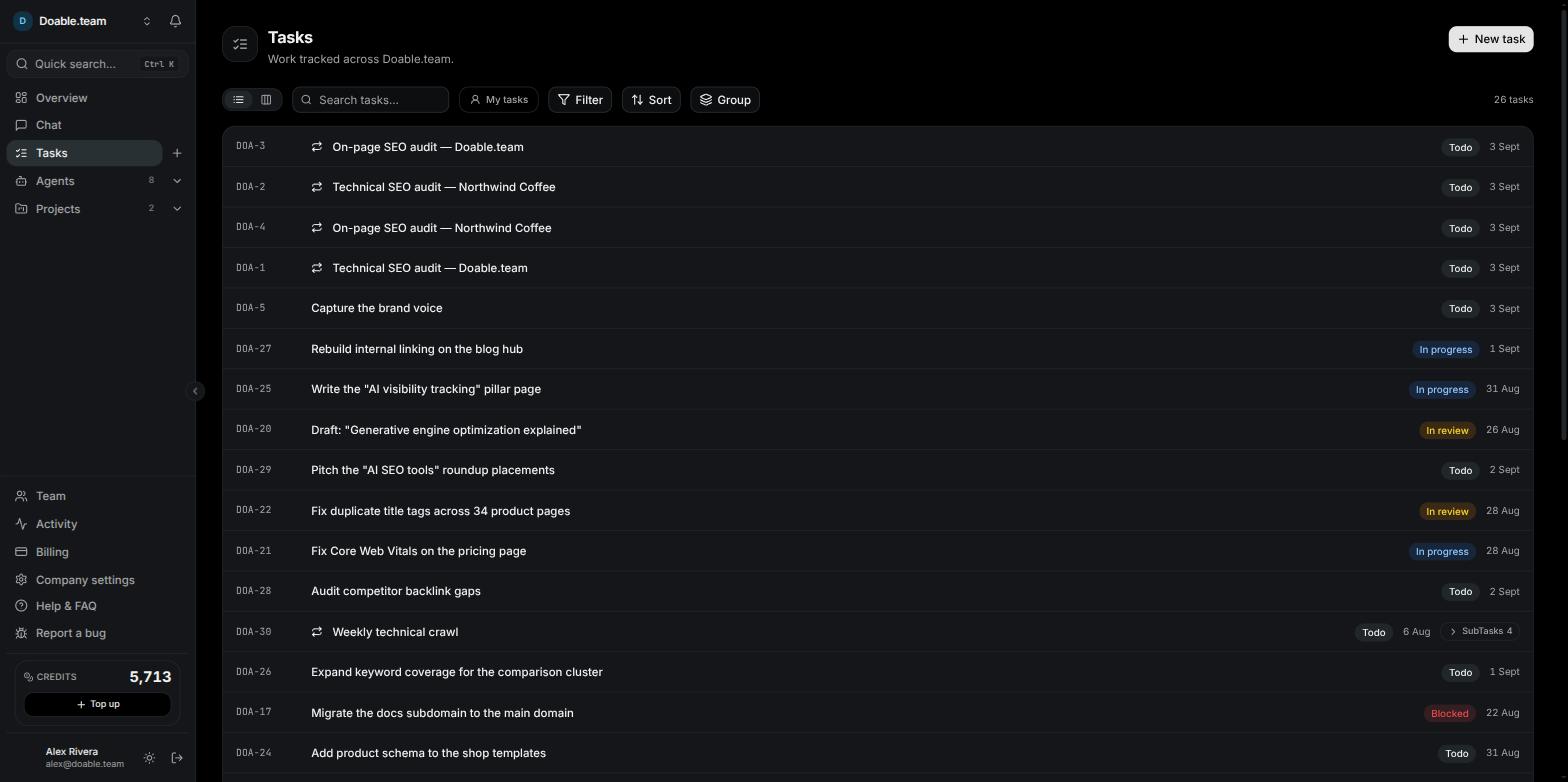
The company Tasks page in List view, with a recurring task expanded to show its occurrences.
List and Board
Use the icon toggle at the left of the toolbar to switch views. Visibility remembers your choice.- List shows one row per task. Hover a row on desktop for a card with its priority, category, project, assignee, due date, labels and the first lines of the description.
- Board shows a column per status, in order: Backlog, Todo, In progress, In review, Done, Blocked, Cancelled. Drag a card onto another column (Drop to move here) to change its status; the card moves immediately and shows a spinner until it is saved. In Board view the Status filter is ignored, because the columns already are the statuses.
Search, filter, sort and group
- Search tasks… matches the title, ID and description in List view (title and ID in Board view).
- My tasks toggles a filter to tasks assigned to you. It is the same as Filter → Assignee → Me.
- Filter offers Status, Priority, Category, Assignee (Me, No assignee, each agent, each teammate), Project (on the company page only), Labels, and Isolate recurring tasks. The button shows how many filters are active and an × to clear them.
- Sort (List view only): Status, Priority, Title, Created or Updated. Click the active field again to flip the direction. The default is Updated, newest first.
- Group (List view only): Status, Priority, Assignee, Date or None.
- Reset clears the search, filters, sort and grouping. Your settings are remembered per company.
Quick actions on a task
Right-click a row or card (long-press on touch) for Open, Set status, Set priority, Copy task ID and Copy link. There is no multi-select; each task is changed on its own.Creating a task
1
Open the New task dialog
Click New task at the top of the Tasks page, hover Tasks in the sidebar and click the +, or press Ctrl/⌘ K and choose New task. On a project’s Content or Link building page use New content task or New link task, which pre-select the category.
2
Type a title
The Task title field is the only required field. Make it specific: it is the first thing the agent reads.
3
Choose who it is for and where
The For … in … row has two pills. The first lists the agents and people you can assign to (or Unassigned); the second lists No project and your projects. Opening the dialog from inside a project fills the project in for you.
4
Write the brief
Type in Add description…. Markdown is supported. This text becomes the Task brief at the top of the thread, so put the goal, constraints and any links here. For a Content task an extra Import content from a URL (optional) field appears; paste a public page address to pull its text into the draft.
5
Set the details in the bottom toolbar
- Category: General (default), Content, Link building, Technical or On-page.
- Status: defaults to Todo.
- Priority: defaults to Medium.
- Labels: tick existing labels, or type a New label name, pick a colour and press +.
- Upload: stage one or more files. They show as cards you can remove before creating.
- Due date: a date picker with Clear.
6
Create it
Click Create task. The button reads Creating…, then Uploading… if you staged files, and you land on the new task. Discard clears the draft; closing the dialog instead keeps your draft for next time.
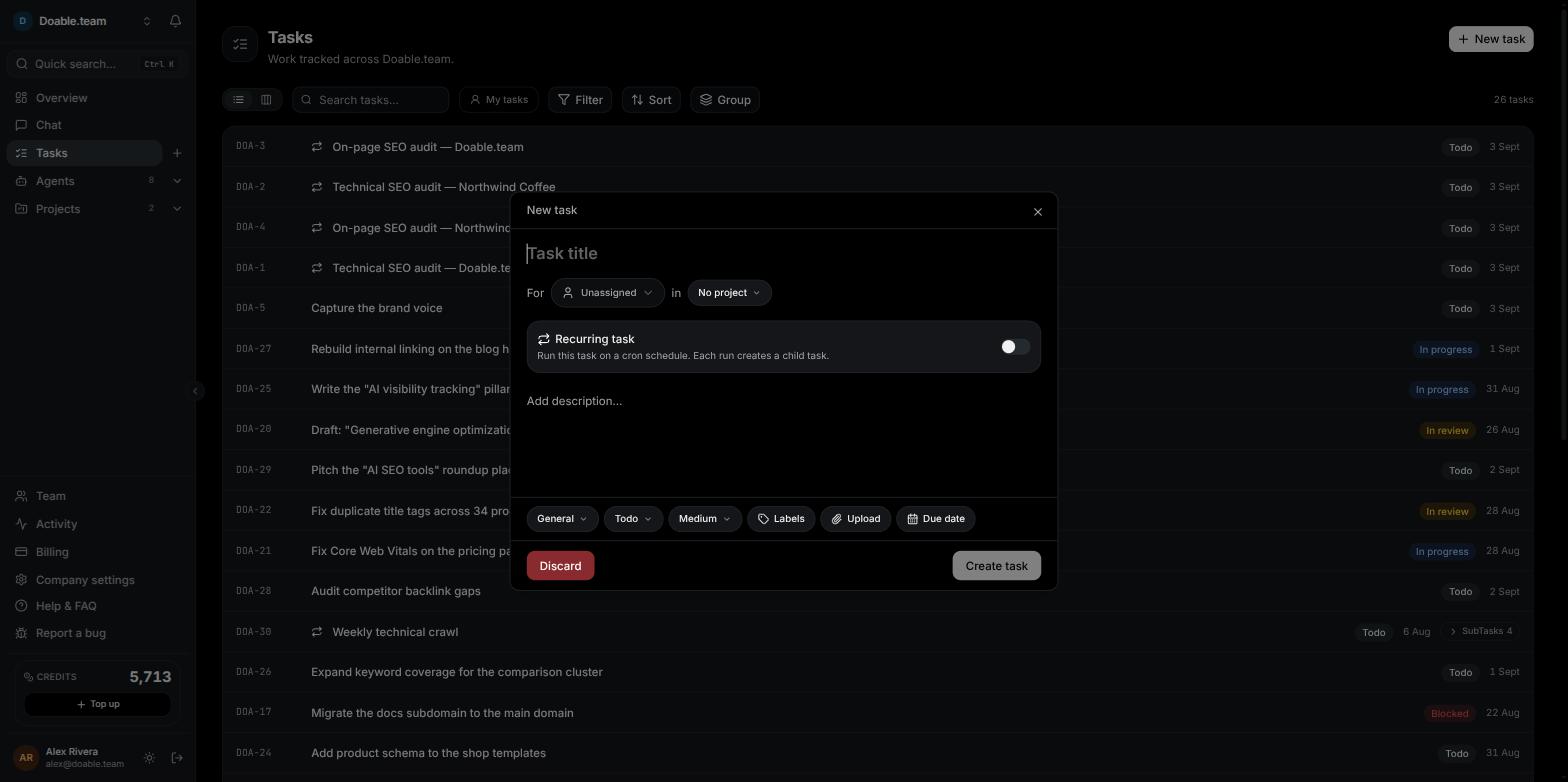
The New task dialog: title, assignee and project pills, description, and the detail pills along the bottom.
If you pick an agent and a project it does not work on yet, a blue note tells you the agent doesn’t have access to that project yet and that creating the task grants it. You do not need to change the agent’s access first.
Creating a task from another screen
Any button that hands work to an agent opens the New task dialog prefilled; nothing is created silently. Review the title, brief, category, project and the pre-chosen agent, then click Create task. You will meet this on the Opportunities page (Create a Task and Create task), in an agent’s keyword tables in a thread (Create content task), in the Content Planner, and in the content editor (Get keywords). Each of these keeps its own draft, so it never overwrites a half-written task from the main New task button. Agents create tasks too. The Head Agent and other agents can break work down or delegate to a peer, and the new task then shows the agent under Created by.Statuses, priorities and categories
Statuses
Statuses always appear in this order, in Board columns and when grouping by status. Agents change the status themselves as they work; you can change it at any time from the Details panel, the Edit dialog, the right-click menu or by dragging on the Board.
Priorities
Critical, High, Medium (the default) and Low. Each shows as a pill with a glyph: an alert triangle, an up arrow, a dash and a down arrow. Sorting by priority puts Critical first.Categories
All five categories are available on every task, whatever the project’s settings. Project settings only decide whether the Content and Link building pages are shown.
Labels
Labels are company-wide coloured tags. Any member can create one from the New task or Edit task dialog, attach any number to a task, and filter by them.Assigning a task
A task has exactly one assignee: a person or an agent, never both. Set it in the New task dialog, in the Edit dialog, or directly in the Assignee picker of the Details panel (you will see Assignee updated). Who you can assign to depends on your place in the team:- Yourself and the people who report to you.
- People at your own level, if your role has the Assign tasks to peers permission.
- Anyone in the company, if you can manage the company.
- Agents that are on your team or have been shared with you. See Team management.
What happens when an agent is assigned
1
The agent wakes up
As soon as an agent is assigned to a task whose status is Todo or later, a Run is queued. A task left in Backlog waits.
2
You watch it work
In the thread a working bubble shows the agent’s current step, and the composer hint tells you the agent is working.
3
The agent replies
When the Run ends, the agent’s reply appears as a message in the thread, and it usually moves the status, for example to In review or Done.
The task page
Click any row or card to open the task. It is a full-screen page without the sidebar. The header holds Back, the task’s ID and title, its status pill, and the Details, Edit and Run now buttons. The thread fills the main column; the Details panel sits on the right (on a phone it slides over the thread).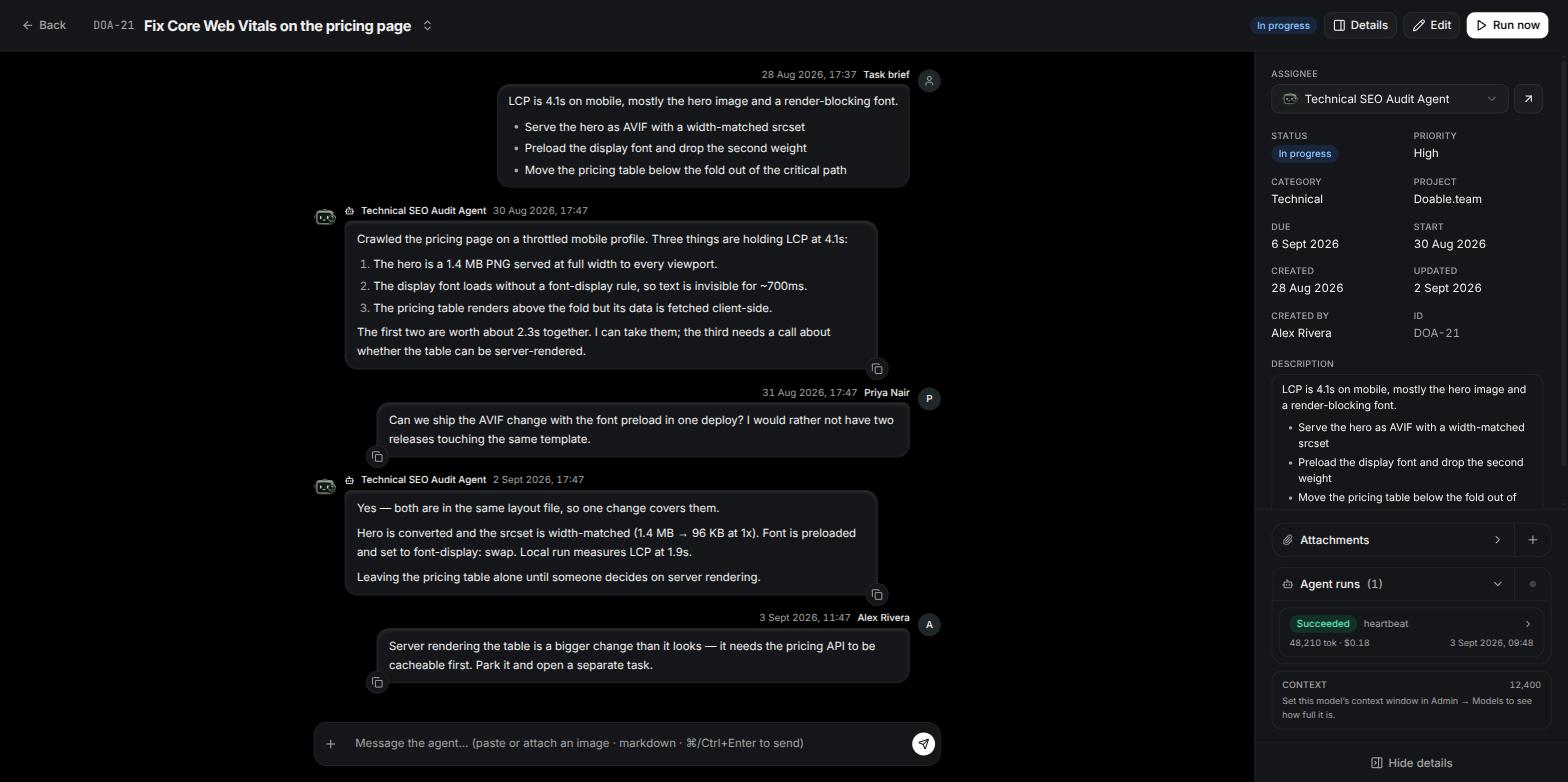
A task thread: the Task brief, the agent's reply and your message, with the Details panel open.
The thread
The description opens the thread as the Task brief bubble. Agent replies sit on the left, your messages on the right. Replies can include keyword tables (with Add N to planner and Create content task buttons), diagrams and lists of attachments. To talk to the agent, type in Message the agent… and click Send or press ⌘/Ctrl+Enter. Markdown works, and you can paste a screenshot or use the image button to attach images; other file types go through Attachments in the Details panel. Your message is posted as a comment and, if an agent is assigned, starts a new Run. The hint under the box reads “The agent replies on its next run.” Hover an agent message for a copy button, or right-click it (long-press on touch) for Copy message, Download tables (.xlsx) when it contains a table, Export as Word (.doc) and Export as Markdown (.md).Run now, Queue and Stop
- Run now in the header starts a Run immediately when an agent is assigned (Queuing…, then Run queued). If it is greyed out, hover it: it tells you to assign an agent first, or that the task is assigned to a person and needs an agent to run.
- While a Run is live the composer changes to Queue a message for when the run ends…. Click Queue to hold one message; it shows as “Queued … sends when the run ends” and is sent automatically when the Run finishes or is stopped. Only one message can be queued at a time.
- Stop cancels the live Run. Stopping needs the Manage agents permission; without it you see an error.
The Details panel
Click Details to open or close it (Hide details at the bottom closes it too). It contains:- The Assignee picker, with an arrow that opens the agent’s page.
- A grid of Status, Priority, Category, Project, Due, Created, Updated, Completed (once set), Created by and ID.
- Subtasks, Recurring, Labels and the Description (with Expand when it is long).
- Attachments (see below).
- Agent runs: the last 12 Runs on this task, with a live dot while one is running. Each entry shows the status, what triggered it, the tokens used, its cost and when it started. Click one for the full Run page with an Overview, a step-by-step Timeline and the Transcript; a live Run has a Cancel run button for anyone with Manage agents. Read more in Agents.
- The Context meter: how much of the assigned agent’s working memory this task is using. When it starts to fill up, a warning suggests starting a fresh task for new work rather than continuing in this one.
Attachments
Open Attachments in the Details panel and click + to upload one or more files, or drop images straight into the thread composer. A progress row shows the percentage, size, speed and time left for each file. Images appear as thumbnails you can click to zoom; other files appear as rows with a Download button. A Delete button appears only if your role can delete tasks. A task holds up to 20 attachments. You can upload images (PNG, JPEG, WebP, GIF), PDFs, Office and OpenDocument files, CSV/TSV, text, Markdown, JSON, RTF and archives (zip, gz, tar, 7z, rar). HTML and SVG files are always refused, and every file is checked before it is stored. The agent sees images inline and can read other files during its Runs.Subtasks
While working a task, an agent can create subtasks and delegate them to a peer agent. They are listed under Subtasks in the parent’s Details panel with their assignee and status, and each one shows “Subtask of ACME-12” pointing back to the parent. When a subtask reaches Done or Blocked, a note is posted on the parent and the parent’s agent resumes.Watching the agent’s browser
When the agent opens a browser during a Run, a Browser panel appears beside the thread (below it on narrow screens) with a live dot and the current address. It is read-only by default. Click Take control to drive it yourself for a timed window, and Release to agent to hand it back. If the agent needs you, for example to sign in, an amber banner reads “Your agent needs you here.” with the reason. The panel disappears when no browser is open.Switching tasks
Click the ID and title in the header to open Switch task. Search by title, ID or description, then click a row to jump to it; the task you are on is dimmed. Back always returns you to the list you came from, not through every task you visited.Editing or deleting a task
Click Edit to open the Edit task dialog. Any member can change Status, Priority, Category, Project, Assignee, Due date, Labels, Description and the Recurring checkbox, then click Save changes. Label changes save as soon as you toggle them. Delete appears in the dialog only if your role has the Delete tasks permission (Admins and Managers by default). Confirm with Delete task. Deletion is permanent and removes the task’s attachments.Recurring tasks
A recurring task is a template with a schedule. It never runs itself; on each tick it creates an occurrence, a normal task named “Title (Run #N)” that copies the template’s project, brief, priority, category and assignee, starts In progress and runs on the assigned agent.1
Switch on the schedule
In the New task dialog switch on Recurring task (“Run this task on a cron schedule. Each run creates a child task.”), or tick Recurring in the Edit task dialog.
2
Pick a timezone and frequency
Choose a Timezone, then a Frequency: Hourly (pick At minute :00, :15, :30 or :45), Daily (a time, in 15-minute steps), Weekly (a time and a day of the week), Monthly (a time and a day of the month from 1 to 28) or Custom (cron) for a five-field cron expression. A summary line such as “Every Monday at 09:00” confirms what you set.
3
Assign an agent
Each occurrence runs on the template’s assignee, so pick an agent. Then click Create task or Save changes.
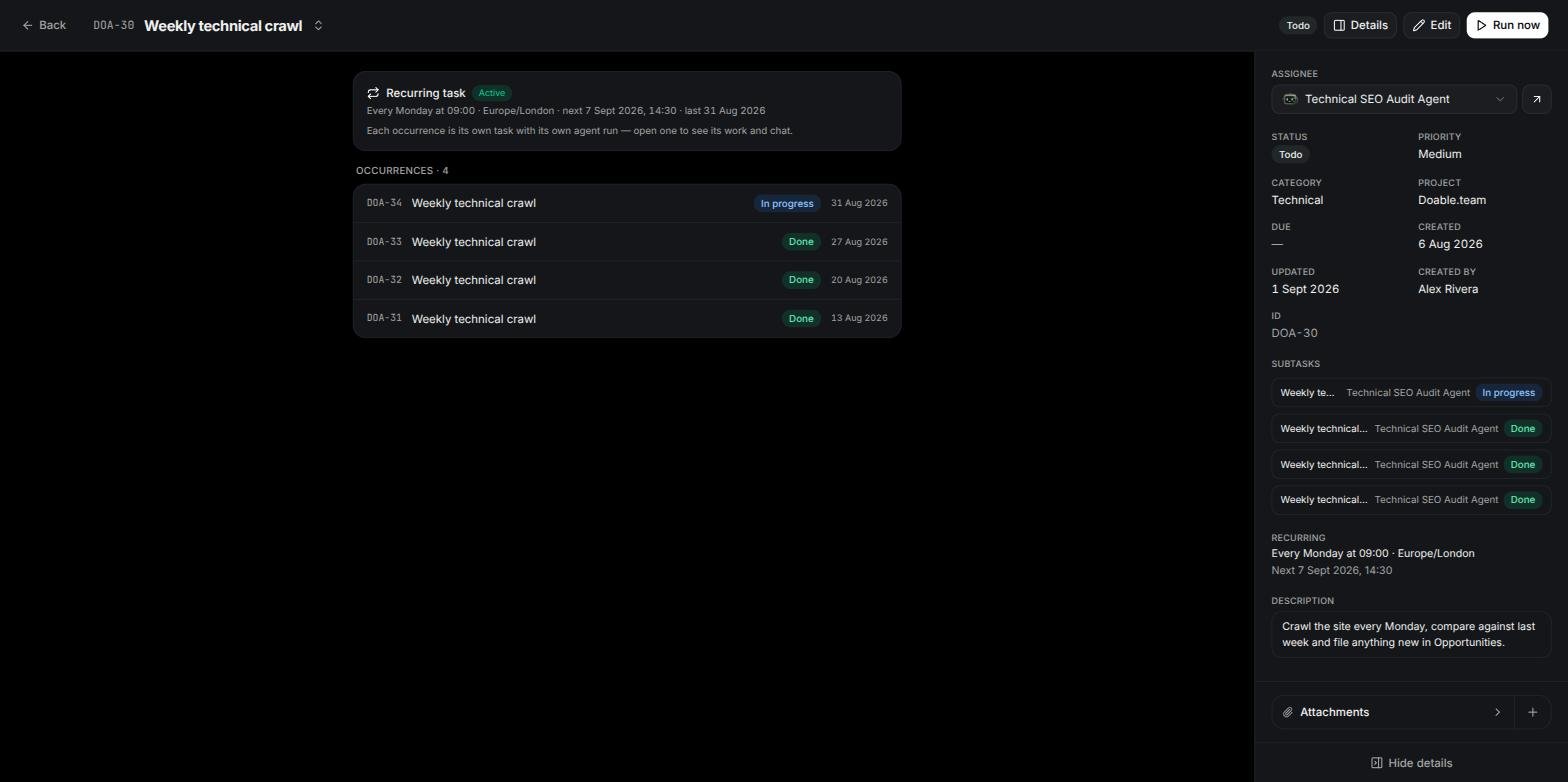
A recurring task: the schedule card and the list of occurrences it has created.
- Run now on a template creates an extra occurrence straight away without moving the schedule (“Run started — a new occurrence was created”).
- If the previous occurrence is still open when the next tick arrives, that tick is skipped.
- To pause, untick Recurring in the Edit task dialog. The schedule is kept and the pill changes to Paused; tick it again to resume.
- Use Filter → Isolate recurring tasks to see only templates.
Content tasks
A task with the Content category opens with two tabs: Content, an autosaving draft editor with an SEO score, Edit with agent on a selected passage, version history and Post to WordPress; and Discussion, the normal thread. The editor and the WordPress publish flow are described in Content and WordPress.The Tasks Overview report
Open a project and choose Reports → Tasks Overview in the sidebar. It answers “how is this project actually going” — how much work exists, how much is finished, who is doing it, and who is handing work to whom. It is always available, as long as the project’s Overview report feature is on (that toggle governs the whole Reports group). Everything on the page obeys the date-range control in the header — 7d, 30d, 90d, 1y or Custom — and the range filters on when a task was created, not when it was worked. A task created before the window but finished inside it will not appear. The range travels in the page address, so a filtered view survives a reload and can be pasted to a colleague.The five headline numbers
Avg. completion can only measure tasks that carry both a start and a finish time, so a task someone dragged straight to Done without it ever being In progress is not counted. If none of the finished tasks in the range carry both, the figure shows a dash rather than zero.
Progress, Performance and Collaboration
Progress is the status mix as a single bar: To do, In progress, Blocked, Done. It is the fastest way to see a project stalling — a wide Blocked band is the thing to click into. Performance breaks the same statuses down per assignee, strongest first by number completed, with an Agent or Member badge so you can see at a glance how the work splits between your team and your agents. Tasks with nobody assigned are counted separately rather than attributed to anyone. Collaboration shows who creates tasks for whom — each row a creator, an arrow, and the assignee they raised work for, with a count. Tasks somebody created for themselves are left out, so what remains is genuine hand-off: which agents your team leans on, and which agents delegate to each other. Three tiles sit alongside: Active contributors (how many people and agents hold at least one task), Tasks per person and Top performer. A project with nothing in the window reads No tasks in this project yet.Approvals and notifications
Tasks are never approved. In review is only a status: the agent has finished and is waiting for you. The two things that do need an Approval, hiring an agent and publishing a draft to WordPress, appear in Inbox → Approvals with Approve and Reject buttons. See Inbox and approvals. Task events reach you inside the app: the bell in the sidebar (which opens the Inbox) and the notification dock at the bottom right. You are notified when a task is assigned to you, when someone comments on a task you created or own, when a Run on it fails, and when a Run completes without the agent posting a reply. The person who performed the action is not notified about it, and a task with no human creator or assignee notifies the company’s admins instead.If your company’s subscription has ended, the workspace is locked: you can read tasks but not create them or start Runs until an admin reactivates it from Billing. See Billing and subscriptions.