

Database means completed Link building tasks. Visibility does not keep an automatic list of acquired backlinks. For prospects to chase, look at the Backlink gaps tab in Opportunities, which lists sites linking to your competitors but not to you.
Activities
An activity is one campaign — Guest Posting, Resource Pages, a niche push — kept as a small spreadsheet inside the project. It has a name, an optional owner, a set of columns you choose, and as many rows as you need. The Activities gallery shows a card per activity with its name, its owner (or Unassigned), how many rows and columns it has, and a preview of the first few. The last tile is a dashed + New activity. With nothing created yet you see “No activities yet — create one to track outreach (prospect URL, email, status, …)”.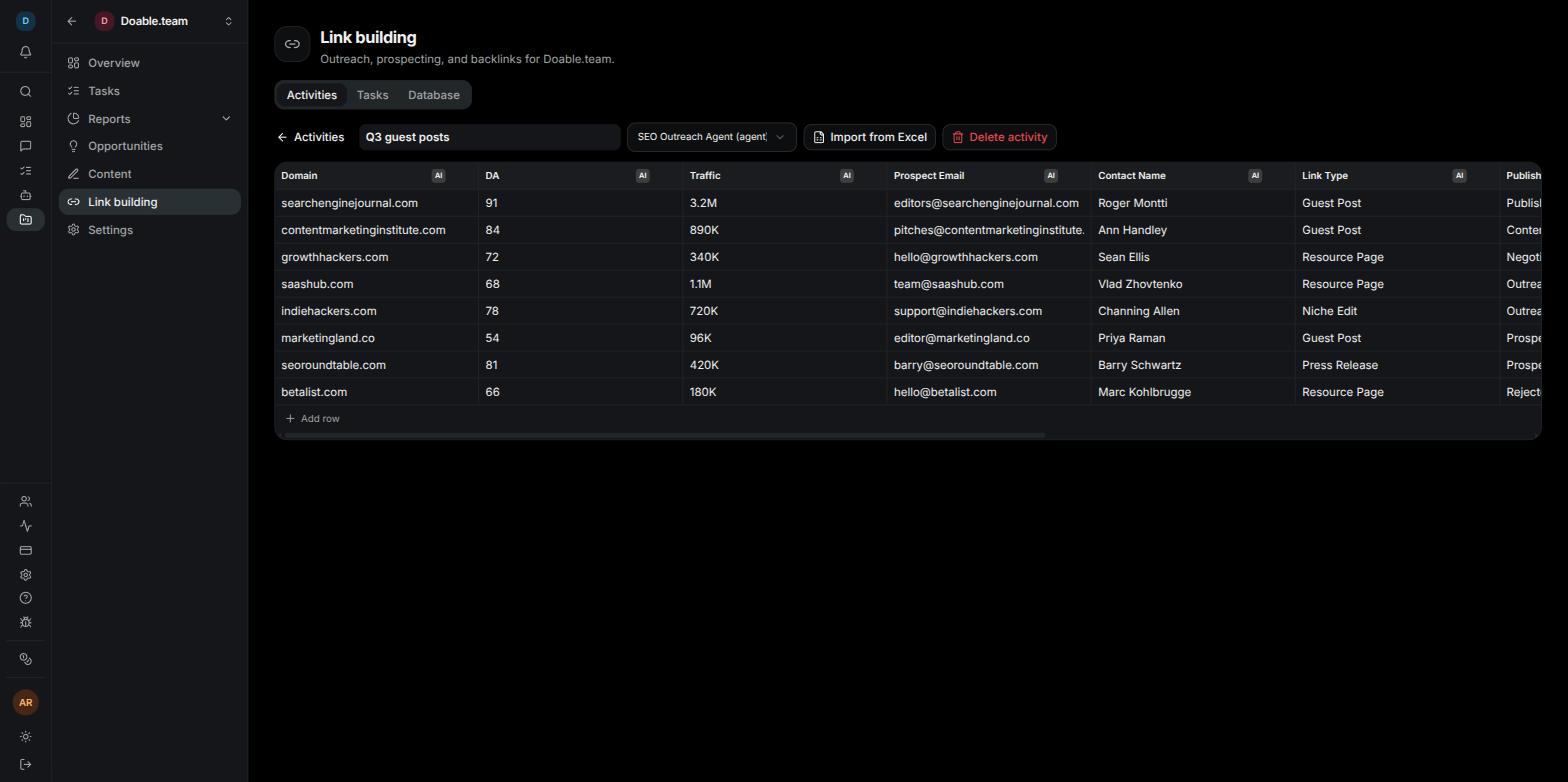
An open activity: the toolbar, the starter columns with their AI badges, and the Add row footer.
Create an activity
1
Open the dialog
On Link building → Activities, click the dashed + New activity tile (or the New activity button in the empty state).
2
Name the campaign
Type a Name — it is required. The placeholder suggests “e.g. Guest Posting, Resource Pages”.
3
Choose who it belongs to
Optionally set Assign to: Unassigned (everyone), a teammate, or an agent (listed as “Name (agent)”).
4
Create it
Click Create activity. The sheet opens with seven starter columns: Prospect URL, Meta Description, Title, Contact Name, Domain, Assignee and Status.
Rename, re-assign or delete an activity
Click the name in the toolbar, type, then press Enter or click away; a blank name is ignored and Escape reverts. Use the owner select beside it to change Assign to at any time. To remove one, click the red Delete activity, type the activity’s name exactly into the confirmation field, then click Delete forever. This deletes every row, including anything your agents filled in, and cannot be undone.Who sees which activity
Assigning an activity to an agent tells agents which sheet is theirs. It does not create a task or start a Run — the agent only touches the sheet while working a Link building task, so you still assign it work in the usual way. See Tasks.
Columns and their AI purpose
Every column carries a one-line AI purpose: what belongs in that cell. The purpose is handed to whichever agent works a Link building task on this project, so editing purposes — not rewriting task descriptions — is how you steer what an agent puts where. Hover the AI badge in a header to read the current purpose.Add ready-made columns
1
Open the picker
In the open activity, click the + at the far right of the header row (Add columns).
2
Pick the columns you want
The dialog reads “Pick preset columns or add your own. Each column’s purpose is given to the agent working this activity, so it knows what to fill in.” Click a preset to add it; each shows its name and its purpose. Clicking one you already added removes it, along with its data.
3
Close the dialog
Changes save as you click.
Several carry judgement calls in their purpose, which is what the agent reads too:
- DA — Domain Authority, 0 to 100; good is 30 or above, premium 50 or above.
- Spam — keep spam under 6% and toxicity under 45.
- Traffic — a high DA with no traffic points at a link farm.
- IP Address — the same address across several sites is a red flag.
- Publishing Status — Prospecting, Outreach Sent, Negotiating, Content Submitted, Published, Rejected.
- Indexing Status — Indexed, Not Indexed, De-indexed.
- Link Type — Guest Post, Niche Edit, Resource Page, Press Release, Sponsored, HARO, Outreach.
Add a column of your own
1
Scroll to the custom block
In the Add columns dialog, go to Add a custom column.
2
Name it
Type a column name, for example “Content Gap Score”.
3
Say what the agent should put there
Fill What should the agent put here? — it is required, because it is what the agent reads to know what belongs in the column.
4
Add it
Click Add column. The button stays disabled until both fields have text.
Rename, re-order or delete a column
- Rename: click the column name in the header, type, press Enter. Blank names are ignored.
- Change its purpose: hover the header, click the pencil (Edit column + its AI purpose), edit AI purpose and click Save. A custom column cannot be saved with an empty purpose.
- Re-order: drag a header onto another header’s position.
- Delete: hover the header, click the ×, then confirm with Delete column and its data. The value is removed from every row and cannot be restored.
Rows
Click + Add row at the bottom of the table, then click into a cell and type. The value saves when you press Enter or click elsewhere; Escape discards the edit. In the Assignee column, pick a teammate or an agent from the dropdown. Click the × at the end of a row to remove it — that happens immediately, with no confirmation. Rows update live while an agent works. If an agent writes to the sheet while you are typing, your open cell keeps your draft and the rest of the table refreshes around it.Import prospects from a spreadsheet
Bring a prospect list in from a.xlsx or .csv file. Rows are always added to the end of the table: an import never replaces, merges or de-duplicates what is already there.
1
Match your headers to the table
The first row of your file must name the activity’s columns. Capitalisation and extra spaces are forgiven and the order is free, but every column in the table needs a header — leave the cells blank where you have no value yet — and no header may be unknown or repeated. Only the first sheet of a workbook is read.
2
Open the dialog
In the activity, click Import from Excel. The dialog lists Columns this table expects as chips; copy those into your header row.
3
Choose the file
Click Choose a spreadsheet and pick it. Your file is checked in the browser straight away, and nothing is sent until it fits.
4
Import
When it fits you see a green “Ready to import N rows · M blank rows skipped. They’ll be added to the end of the table.” Click Import N.
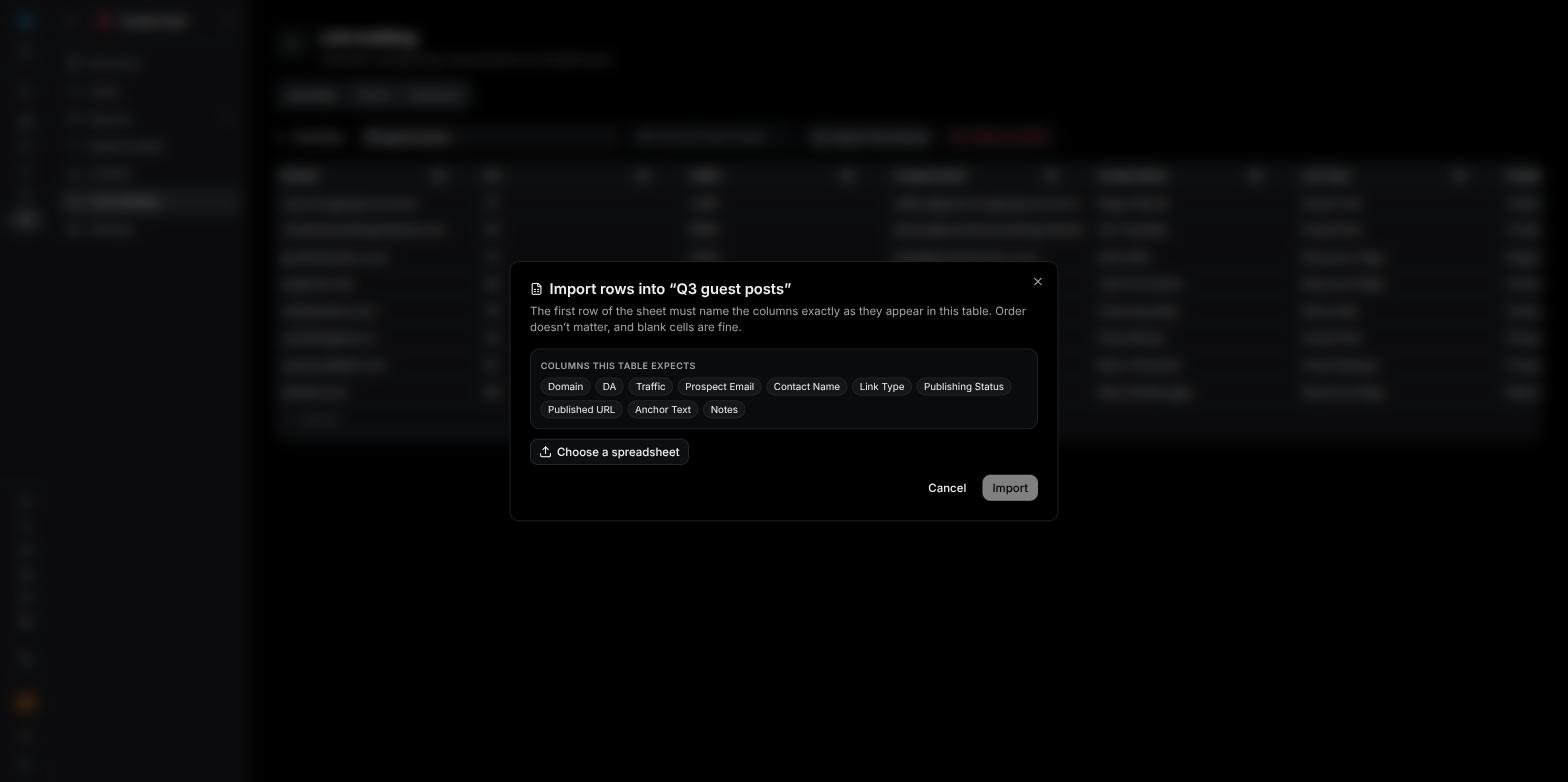
The import dialog listing the columns the table expects before you choose a file.
Completely blank rows are skipped and counted in the summary. Every value arrives as text, so numbers and dates keep the formatting they had in your file.
Tasks and Database
The Tasks sub-tab lists this project’s tasks with the category Link building, showing each task’s ID, title, labels, priority and status. Click New link task to open the New task dialog with the category and project already set. Tasks created anywhere else appear here too, as long as they belong to this project and use that category. Once a task reaches Done it moves to the Database sub-tab. The category matters for more than filtering: an agent is only shown the project’s activities and column purposes while it works a task whose category is Link building.Agents that work on link building
Two presets do this work. Hire them from Agents → Hire agent; see Agents for the hiring flow and for the Approval that appears in your Inbox when someone without the Manage agents permission requests a hire.Backlink Building Agent
“Analyze, strategize & build links.” It needs at least one Assigned project at hire. Working a Link building task, it opens the project’s activity, researches prospects, records them as new rows and fills the cells your columns ask for.- It checks each domain’s rating against Minimum domain rating (0–100) on the agent’s Config → Behavior settings card, 40 by default, and skips anything below it. Ratings are fetched rather than guessed, an unrated domain is reported as unrated rather than 0, and a reported rating is credited as “Domain Rating by Ahrefs”.
- Before logging a prospect it checks how the target page can be reached: a direct submission form, an editorial email pitch, a login wall, a captcha or a paid placement.
- It tries the straightforward route itself. Where a direct submission looks possible it signs up if the site wants an account, fills the form and sends the request, then says which of three things actually happened: it submitted the form, it reached the form but could not complete it, or it only read the guidelines. It never reports “submitted” for a form it did not send.
- It hands the prospect to an SEO Outreach Agent in two cases: the page is gated or wants a human-style pitch (an editorial contact, a guest post), or it tried and the attempt did not go through — the signup refused it, the form rejected it, or no confirmation came back. A failed attempt is a handover, not a dead end. The subtask it raises carries the target URL, the submission or contact path it found, the qualifying metrics and what needs placing, plus what it already tried and how that failed, so outreach does not repeat the same route. Its own task goes blocked while it waits and wakes when the subtask resolves.
- You do not wire that handover up. The SEO Outreach Agent is part of this preset’s workflow, so it is already on the Peers card and the card is read-only. All it needs from you is an SEO Outreach Agent hired in the company — without one, the agent says so on the task instead of quietly dropping the prospect.
- Any disavow list it produces is handed to you as text to review. Visibility never applies it for you.
SEO Outreach Agent
“Find contacts, email & follow up.” This preset must be hired with an email account: Gmail (your address plus a 16-character app password, which needs 2-Step Verification on the Google account) or SMTP (host, port, username and password, with optional inbound IMAP details). Without one, the hire is refused with “This preset needs a configured email account at hire — add the mail details to the draft.” Given an outreach task — or a placement handed over by the Backlink Building Agent — it researches a real contact from the site’s own contact, about or team pages, writes the email for that recipient and sends it from its own mailbox. There are no templates. A handed-over placement arrives with the route its colleague already tried and how that failed, so it starts from a human approach rather than repeating a submission that has already been refused. After the first email it starts a follow-up sequence. Set the cadence under Config → Behavior settings → Follow-up intervals (hours, comma-separated); the default72, 168, 336 follows up after 3 days, then 7, then 14. Each follow-up is written fresh when it falls due, and follow-ups only go out while the agent is active — pause the agent and they wait.
If a submission is blocked by a captcha, a login wall or a paid gate, the agent does not work around it. It reports what it tried, marks the subtask blocked, and hands it back to you.
The Mail tab
Each agent’s Mail tab lists the accounts it can send from and, below them, Sent (N) — every email it has sent with a Sent or Failed badge, the subject, the recipients and the time. Use Test on an account card to check sending and inbound access, the switch to disable an account without deleting it, and Edit to change details. Only members with Manage agents can change accounts; everyone else sees the tab read-only, and credentials are never shown again after they are saved.Replies are detected only when the account has inbound (IMAP) details. With them, a reply stops the follow-up sequence and wakes the agent to answer. Without them the account card reads “No IMAP — replies won’t be detected” and follow-ups run to the end of the plan. The Mail tab is a record of what was sent; it is not an inbox you read replies in.
Put an agent to work on an activity
1
Hire the agent
Agents → Hire agent, pick Backlink Building Agent, assign the project it may work on, and hire.
2
Tune its settings
On the agent’s Config tab, set Minimum domain rating if 40 is not right for you. You do not need to touch Peers — the SEO Outreach Agent is already there as part of the preset’s workflow, and the card is read-only. If you want placements it cannot complete on its own to be picked up and emailed, hire an SEO Outreach Agent as well.
3
Prepare the sheet
Create the activity and its columns first. Agents fill activities that already exist — they never create, rename or delete one, nor its columns.
4
Give it a task
Create a task on that project with the category Link building, assign it to the agent, and describe the campaign: the niche, the target pages and what you want placed.
5
Follow the work
Watch the run timeline on the task and the rows appearing in the activity. See Agents for reading a run.
Turn the page or a sub-tab off
1
Open the project's features
Go to the project’s Settings and open the Features tab.
2
Flip the switches
Under Workflows, the Link building switch controls the whole page. With it on, the indented Activities, Tasks and Database switches choose which sub-tabs appear.