Create a project for a client site, finish its setup, and manage its pages, integrations, refresh schedules, memory and saved sign-ins.
A Project is one website you track inside a Company. It holds the site’s domain, its competitors, your brand names, the topics you target and the market you sell into, and its settings decide which pages and tools are switched on for it. Tasks, keywords, reports, opportunities, content and integrations all belong to a project.Most work in Visibility happens inside one: an Agent can only work on the projects it is assigned to, and every report reads its numbers against the project’s domain.
Click Projects in the sidebar. The page is headed Projects, with a New project button at the top right, a count such as “3 projects”, and a Show archived / Hide archived toggle.Each project is a card showing its logo or initials, its name and domain, and six metrics: sessions, clicks, AI vis. (%), keywords, open tasks and opps. A metric reads ”—” when the source behind it is not connected yet. Archived projects are dimmed and carry an Archived label.
The Projects page, one card per client site with its headline metrics.
The Projects row in the sidebar also expands into a list of your projects, with a + (Add project) that opens the same dialog. If you have no projects yet you see “No projects yet — Add a client site to start tracking SEO work.”
Any member of the company can create a project. Only the name is required.
1
Open the New project dialog
Click New project on the Projects page, the + beside Projects in the sidebar, New project in the project switcher, or press Ctrl/⌘ K and choose the new-project action.
2
Name the project
Type a Project name (up to 200 characters). Pressing Enter here creates the project straight away.
3
Describe it
The description is optional but worth writing: agents working on this project’s tasks receive the name and description as context. Write it like a brief for a new teammate — audience, tone, goals and constraints. Up to 2,000 characters.
4
Enter your domain
Under SEO Configuration, type Your domain — either a bare host such as yourbrand.com or an https:// address. Read the notice beside it: this is a one-time setting. An http:// address is rejected with “Use https:// — an http:// address isn’t accepted”.
5
Add competitor domains
Type a competitor domain and press Enter, or paste a comma-separated list. Each entry is checked for being a real domain, and duplicates are dropped. You can add up to 50.
6
Assign people and agents
Under Assign people & agents, use Search people and agents… to pick teammates and agents, or use the Assign all agents row. Agents only work on the projects they are assigned to.
7
Create it
Click Create project. You land on the new project’s Overview.
Every feature is switched on for a new project; narrow it down later in Settings → Features. The dialog keeps your draft across a page refresh, and Discard clears it.
Assigning people records who is responsible for the project. It does not hide the project from your other teammates. Up to 50 people can be assigned.
Your plan sets how many projects a company can have: 3 on Starter and 6 on Growth, counting only projects that are not archived. Past that you see “You’ve reached your plan’s project limit — This plan allows up to N projects. Upgrade to add more.” See Billing and subscriptions. A company that has not finished onboarding is asked to “Finish setting up the workspace before creating projects.”
Where this is available on your workspace, the sparkle button beside the description writes it for you from the site itself.
1
Fill in the name and domain
The sparkle button stays disabled until the project has a name and a valid domain; its tooltip names whatever is still missing.
2
Click the sparkle button
Its label is Write this description with AI.
3
Confirm
The dialog asks “Write the description with AI?” and explains that it will read your domain and summarise it. It warns you if this would replace text you have already written. Click Generate.
4
Wait, then edit
You see “Reading your domain… This takes a few seconds — please don’t close this window.” The dialog can’t be closed while it works. The finished text lands in the description field and is yours to edit before you create the project.
If the site can’t be read you see, against the domain field, “We couldn’t read this domain, so the description couldn’t be generated. Check it’s correct and publicly reachable.” A generated description is capped at 1,200 characters, and generating them is rate-limited per person.
The domain is what every number in the project is measured against, so it locks as soon as there is anything to measure.
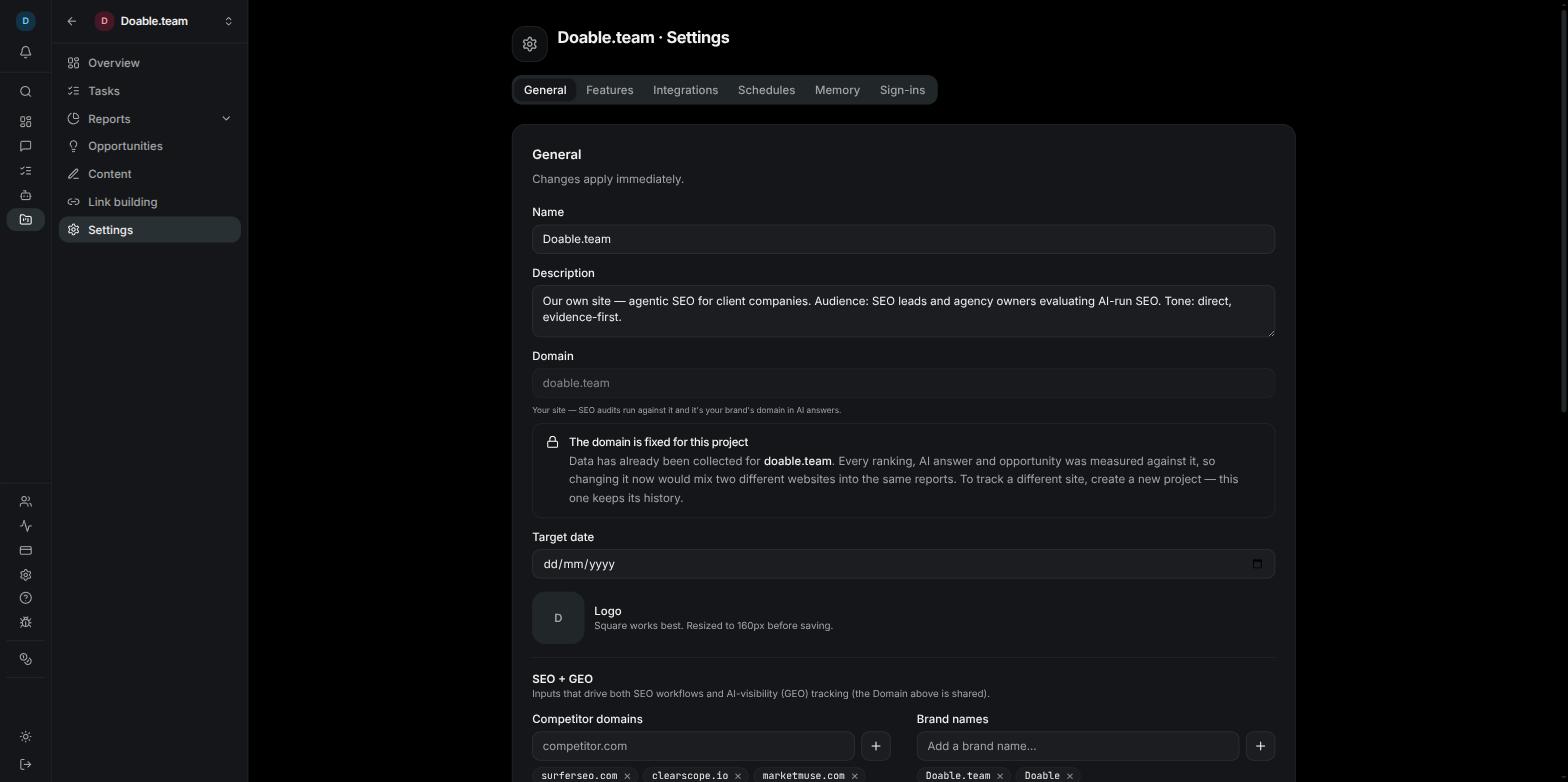
While no data has been collected, the Domain field in Settings → General is editable and shows “Set this carefully — it’s a one-time setting”.
Once any rankings, AI answers, opportunities, backlinks or traffic exist, the field turns read-only: “The domain is fixed for this project — Data has already been collected… To track a different site, create a new project — this one keeps its history.”
Tidying the same host — fixing the capitalisation, adding or dropping www., adding https:// — is not treated as a change. A rebrand or a genuinely different site means a new project, and the old one keeps its history.
Open a project and the company sidebar collapses to an icon rail, with a second sidebar for the project beside it. At the top are a back arrow (All projects) and a project switcher listing your projects, All projects and New project. Switching projects from that dropdown keeps you on the same section.
Section
What it is
Overview
The project’s report summaries and its setup checklist. Always present.
The Reports group appears while the Overview report feature is on, and each report page inside it follows its own toggle — Tasks Overview and Custom Dashboards are always available. Opportunities, Content and Link building appear when their toggles are on.
The Overview is the project’s front page: the project name, a date filter, and stacked report summaries — Tasks and Site authority side by side, then Keyword ranking, AI visibility and Organic traffic. Each section carries a button through to the full report and a “Last checked” or “Last run” stamp.
The project Overview: the setup bar, then a summary of each enabled report.
Use the date filter in the header to choose 7d, 30d, 90d, 1y or Custom (a start and end date up to 365 days apart). The default is 30d. Every section follows the same window, and your choice is kept in the page address, so a link shares the same view.Site authority shows Domain Rating, a 0–100 score provided by Ahrefs, as a ring for your domain next to the same score for each competitor domain. Unrated means the score is unknown, not zero.
Until a project is fully set up, a one-line bar under the header shows your progress, for example “2/6”, with either the one thing that is missing or “4 things left to set up”.
1
Open the checklist
Click the bar. It opens “Finish setting up this project — Each one turns on something the reports and agents can use.”
2
Work through the outstanding rows
Each row says what it unlocks and links straight to where it is fixed: Set the project’s domain, Add your brand names and Add competitor domains go to Settings → General; Add keywords to track goes to the Keyword Ranking page; Connect Search Console and Connect Google Analytics go to Settings → Integrations.
3
Finish
When every item is done the bar disappears.
Only items that serve a feature you have switched on are listed — a project with AI visibility off is never asked for brand names.
Open Settings in the project sidebar. The header reads the project name followed by Settings, with a tab row: General, Features, Integrations, Schedules, Memory and Sign-ins. Each tab has its own address, so you can link straight to one.
Tab
Who can change it
General, Features, Memory, Sign-ins, assigned agents, archive and delete
The Manage company permission (Admin by default). Sign-ins is admins only.
Integrations
The Manage integrations permission (Admin and Manager by default).
Schedules
Any member can view, edit and run them.
Members without the permission still see the settings, read-only: General shows a Details card with the note “Only workspace admins can change these — ask one if something here needs updating.” See Team management for roles and permissions.
Settings → General, with the SEO + GEO block for competitors, brand names, topics and location.
The General form saves with Save changes and applies immediately (“Project saved”).
Field
What it is for
Name and Description
How the project appears, and the standing brief every agent receives with its tasks.
Domain
The site being optimised. Editable until data has been collected, then fixed (see above).
Target date
A calendar date you are working towards, shown on the project.
Logo
Hover the logo square, click the camera button and pick an image. It saves at once (“Logo updated”); Remove clears it. Square works best — it is resized to a 160px square before saving.
The SEO + GEO block holds the inputs that drive both SEO workflows and AI-visibility tracking:
Competitor domains — press Enter or type a comma to add one; each is validated. Up to 50. Used for share of voice, AI-visibility comparisons, the Site authority card and the competitor gap detectors.
Brand names — press Enter to add. Commas are kept, so “Smith, Jones & Co” stays one name. These are the names AI-visibility checks look for in assistant answers. Up to 50, each up to 200 characters.
Suggested competitors — pills for domains the AI assistants named in this project’s answers, six at a time with Show N more. Click one to add it. Directories are listed separately with the note that they are better as citation targets than competitors, and adding one removes it from your AI Citations tab.
Topics — the subject areas the project targets, used by AI visibility. Up to 50.
Location — the market you are tracking, either a country or City, Region, Country.
A brand name of three characters or fewer, or an everyday word such as “store”, “app” or “design”, shows an amber warning. Such names match unrelated text in assistant answers and will overstate your visibility. Use the name people actually search for.
Below the form, the Agents card is the project’s agent access list: only the agents ticked here can work on this project, and an empty list means none can. Tick them in the multi-select or use Assign all agents, then click Save (“Assigned agents updated”). Removing an agent revokes its access immediately; assigning it a task on this project grants access again. This is enforced everywhere, not just in the interface.
Features decides which pages and tools this project has. Toggles save instantly and the project sidebar updates to match.
Group
Toggles
—
Overview report — the Overview’s report sections and the Reports group.
Pages
Keywords, AI visibility, Organic traffic, Opportunities. Each enabled page appears in this project’s sidebar.
Workflows
Content, with sub-toggles Planner, Tasks and Database; Link building, with Activities, Tasks and Database.
Turning a page off hides it and its Overview section but deletes nothing — switch it back on any time and the data is still there. Overview, Tasks, Custom Dashboards and Settings can’t be hidden, and WordPress has no toggle: it is available whenever a site is connected under Integrations.
Integrations is where you connect the data sources this project uses: Google Analytics, Google Search Console and WordPress. Each card shows a status badge (Connected, Choose property, Choose site, Reconnect) and the connected property or site name. Buttons you don’t have permission to use stay visible but disabled, with a tooltip explaining why.
Google Analytics — click Connect, approve read access on Google’s screen, then click Choose property and pick a GA4 property. Use Change property to repoint it or Disconnect to remove it.
Google Search Console — click Connect, approve on Google’s screen, then click Choose site and pick a verified site. If the Google account has none, the picker says “No verified sites on this Google account.”
WordPress — click Connect, install the Agentic SEO for Visibility plugin on your site, then click Generate pairing code and paste the code into the plugin. Once paired, the card shows the site name and reminds you that publish requests are approved in Inbox → Approvals.
Only the teammate whose Google account made a connection can change its property or site; anyone with Manage integrations can disconnect and reconnect with their own account. If access is lost, the badge turns red with Reconnect and a plain-English reason. Organic traffic renders with either Google Analytics or Search Console alone — neither one needs the other.Full setup instructions live in Integrations; publishing is covered in Content and WordPress and approvals in Inbox and approvals.
Bringing your own DataForSEO key is a company-wide choice, not a project one. It lives under Company settings → AI clients → Data providers. See Credits and BYOK.
Schedules is where you decide how often the platform refreshes each SEO data source. All times are in UTC. The tab has two inner views: Overview, with a card per job, and History.
Settings → Schedules: a card per data source with its schedule, credit estimate and Run now.
There are seven jobs:
Job
What it refreshes
Keyword Rankings
SERP positions for tracked keywords.
AI Visibility
AI-assistant visibility checks. Weekly minimum.
Organic Traffic
Organic sessions from Google Analytics.
Content Opportunities
Content gaps from Search Console.
Competitor Content Gaps
Content your competitors cover and you don’t.
Competitor Link Gaps
Links your competitors have and you don’t.
AI Citation Gaps
Sources AI assistants cite that don’t mention you.
Each card shows the job’s title, an Active or Inactive badge, the schedule in words (“Every Monday at 09:00 UTC” or “Not scheduled”), Next and Last times, an estimate such as “~55 Credits est. / run”, and the outcome of the last run. Active cards also carry Run now and Edit. An Inactive card lists what the job still needs before it can run — a project domain, a tracked keyword, a connected property, a competitor — each with a link to fix it.New projects start with Keyword Rankings, Content Opportunities and the three gap detectors refreshing weekly, and Organic Traffic twice a day. If a card reads Not scheduled, click Edit to give it a day and time.
On an Active card click Edit. The dialog is headed with the job name and “How often the platform refreshes this data source.”
2
Pick a frequency
Choose Off, Hourly, Daily, Weekly, Monthly or Custom. AI Visibility and the three gap detectors are not offered Hourly or Daily; their dialog adds “This source runs weekly at most.”
3
Set the time
Pick an hour (00–23) and a minute (:00, :15, :30 or :45) in UTC, plus a day of the week for Weekly or a day of the month (1–28) for Monthly. A summary line previews the result, for example “Every Monday at 09:00”.
4
Save
Click Save. The card shows the new schedule and its next run.
Find the job — it must be Active — and read the “~N Credits est. / run” line, which is costed against today’s tracked keywords and enabled prompts.
2
Run it
Click Run now and confirm: “This runs immediately and will cost ~N Credits, debited from this company’s balance right away.”
3
Wait for the result
The button reads Running… until it finishes — up to a minute or two for AI Visibility — then you get a toast telling you the run succeeded or why it failed, and the card’s last-run line updates.
Only one run per job can be in flight at a time; a second attempt is refused with “a run is already in progress for this job — try again once it finishes.” Manual runs are rate-limited per job over a short window, and the message tells you the allowance. A manual run also clears an automatic pause caused by repeated failures.When the latest run failed, the card offers Retry instead — the same action, beside the error. For the full record, open History and expand a job: each row shows Succeeded or Failed, a Manual or Scheduled badge, when it ran, what it cost in credits, and Show error on failures. Load more pages further back, 20 rows at a time and up to 100 per job. Jobs that have never run read “No runs recorded yet.”
Project memory is what every agent working on this project knows about it. It is injected into every run on this project and never into another project’s work.Five sections carry the standing context — Voice & Taste, Audience, What Works, Constraints and Open Threads. Click Edit on one, write, and click Save; saving locks that section so agents can’t rewrite it.Below them, Recorded facts are short dated notes, each with a kind pill (Fact, Preference, Constraint, Playbook or In flight) and a line saying whether it was recorded by an agent or added by a person. Type into “Add a note every agent on this project should know…” and press Enter or click Add. The × on any note retires it, whether an agent or a person wrote it.Editing needs Manage company; everyone else reads. Agents have their own separate memories, and company-wide facts belong in Company settings — see Agents for how the three fit together.
Some work needs an agent to be signed in to a client’s site. Saving a sign-in here captures the session once, so agents start already signed in and never see the password.
1
Open a browser
Go to Settings → Sign-ins (admins only). Enter the Sign-in page URL, for example https://example.com/wp-login.php, and click Open a browser.
2
Sign in yourself
Sign in inside the embedded browser, exactly as you would normally.
3
Check the domain and save
The Domain field is prefilled from the URL and editable — make sure it matches where the site keeps you signed in. Click Save this sign-in, or Discard to throw it away. You then see “Saved — Agents working on this project can now use the sign-in.”
Stored for this project lists each saved domain with its cookie count, expiry (or “session only”), and when it was last used. Expired entries offer Sign in again, and the trash icon forgets one. Only the cookies for the domain you enter are saved, they are stored encrypted, and they are handed to an agent’s browser only while it works on this project.
Never put a real password into the Login Email/Password columns of a Link building import. Saved sign-ins are the right place for credentials.
Both live in the red-bordered Manage card at the bottom of Settings → General, and both need Manage company.
1
Archive
Click Archive. The project disappears from the default Projects list but stays reachable through Show archived, and the button becomes Unarchive.
2
Unarchive
Open the archived project and click Unarchive to put it back in the active list.
3
Delete
Click Delete, read “Delete this project? — it will be permanently removed. This can’t be undone.”, and confirm with Delete project. You return to the Projects list.
Archived projects don’t count against your plan’s project allowance, and their schedules stop being Active. Deleting is permanent — archive instead if there is any chance you will want the history back.
{"docsConfig":{"theme":"mint","$schema":"https://mintlify.com/docs.json","name":"Visibility Docs","colors":{"primary":"#171717","light":"#e5e5e5","dark":"#0a0a0a"},"logo":{"light":"https://mintcdn.com/doableteam-a944c448/yZxfxMRqwidNc6fj/logo/light.png?fit=max\u0026auto=format\u0026n=yZxfxMRqwidNc6fj\u0026q=85\u0026s=e1fd35ed3273f515f71eeea2dadf78bc","dark":"https://mintcdn.com/doableteam-a944c448/rtDno5BzOkv5Z5j1/logo/dark.png?fit=max\u0026auto=format\u0026n=rtDno5BzOkv5Z5j1\u0026q=85\u0026s=b596ae0dadfdf638afa6e7647926f980"},"favicon":"https://mintcdn.com/doableteam-a944c448/zTMBed2Ps_Y8Loxi/favicon2.png?fit=max\u0026auto=format\u0026n=zTMBed2Ps_Y8Loxi\u0026q=85\u0026s=ee604d5930191a7b8e1e524f7bfa06a5","footer":{"socials":{},"links":[{"header":"Product","items":[{"label":"Open Visibility","href":"https://app.visibility.so"},{"label":"Status","href":"https://status.visibility.so"}]}]},"icons":{"library":"fontawesome"},"styling":{"latex":true},"navigation":{"pages":[]}},"deployment":{"deploymentMetadataValue":{"subdomain":"doableteam-a944c448","hasAudioNarration":false,"actualSubdomain":"doableteam-a944c448","customDomains":["docs.visibility.so"],"gitSource":{"type":"github","owner":"muhammedilyasy","repo":"visibility-docs","deployBranch":"main","isPrivate":true,"contentDirectory":"","mountPath":"","label":""},"chroma":{"liveDeploymentHistoryId":"6aa1001aa24ff9286dbd94f6","collectionId":"c6362ac3-9167-4500-94f6-a10bb4528c5f","schemaVersion":"v3","latestBuiltDeploymentHistoryId":"6aa1001aa24ff9286dbd94f6"},"entitlements":{},"buildId":"6aa1001aa24ff9286dbd94f6","clientVersion":"0.0.3908","searchFilterCounts":[{"language":"default","tag":"Documentation","count":22},{"language":"default","tag":"Projects \u0026 SEO","count":9},{"language":"default","tag":"Agents \u0026 work","count":4},{"language":"default","tag":"Team \u0026 company","count":3},{"language":"default","tag":"Getting started","count":3},{"language":"default","tag":"Billing","count":2},{"language":"default","tag":"Changelog","count":1},{"language":"default","tag":"Updates","count":1},{"language":"default","tag":"FAQ","count":1},{"language":"default","tag":"Help","count":1}]},"assistantConfig":{"enableAskAiButton":false,"enableStarterQuestions":false,"enableContextualStarterQuestions":false,"enableAskAiSearchBar":true},"hasChatPermissions":false,"hasWebMcpPermissions":false,"toggles":[{"name":"kill-isr","enabled":true,"variant":{"name":"disabled","enabled":false,"feature_enabled":true},"impressionData":false},{"name":"agent-mintlify-slack","enabled":true,"variant":{"name":"disabled","enabled":false,"feature_enabled":true},"impressionData":false},{"name":"editor-v7-file-tree","enabled":true,"variant":{"name":"disabled","enabled":false,"feature_enabled":true},"impressionData":false},{"name":"agent-integrations-settings","enabled":true,"variant":{"name":"disabled","enabled":false,"feature_enabled":true},"impressionData":false},{"name":"automations-pr-grouping","enabled":true,"variant":{"name":"disabled","enabled":false,"feature_enabled":true},"impressionData":false},{"name":"custom-prefix","enabled":true,"variant":{"name":"disabled","enabled":false,"feature_enabled":true},"impressionData":false},{"name":"analytics-v7","enabled":true,"variant":{"name":"disabled","enabled":false,"feature_enabled":true},"impressionData":false},{"name":"user-flows-analytics","enabled":true,"variant":{"name":"disabled","enabled":false,"feature_enabled":true},"impressionData":false},{"name":"no-publish-flow","enabled":true,"variant":{"name":"disabled","enabled":false,"feature_enabled":true},"impressionData":false},{"name":"workos-onboarding","enabled":true,"variant":{"name":"disabled","enabled":false,"feature_enabled":true},"impressionData":false},{"name":"llms-txt-v2","enabled":true,"variant":{"name":"disabled","enabled":false,"feature_enabled":true},"impressionData":false},{"name":"pause-universal-search-reconcile","enabled":true,"variant":{"name":"disabled","enabled":false,"feature_enabled":true},"impressionData":false},{"name":"snapshot-serving-live","enabled":true,"variant":{"name":"disabled","enabled":false,"feature_enabled":true},"impressionData":false},{"name":"stripTemperatureMiddleware","enabled":true,"variant":{"name":"disabled","enabled":false,"feature_enabled":true},"impressionData":false},{"name":"per-site-search-delta","enabled":true,"variant":{"name":"disabled","enabled":false,"feature_enabled":true},"impressionData":false},{"name":"support-platform-pylon-zendesk","enabled":true,"variant":{"name":"disabled","enabled":false,"feature_enabled":true},"impressionData":false},{"name":"editor-branches-v2-autocommit","enabled":true,"variant":{"name":"disabled","enabled":false,"feature_enabled":true},"impressionData":false},{"name":"editor-branches-v2","enabled":true,"variant":{"name":"disabled","enabled":false,"feature_enabled":true},"impressionData":false},{"name":"snapshot-serving","enabled":true,"variant":{"name":"disabled","enabled":false,"feature_enabled":true},"impressionData":false},{"name":"instant-rollback","enabled":true,"variant":{"name":"disabled","enabled":false,"feature_enabled":true},"impressionData":false},{"name":"granular-notifications-server","enabled":true,"variant":{"name":"disabled","enabled":false,"feature_enabled":true},"impressionData":false},{"name":"granular-notifications","enabled":true,"variant":{"name":"disabled","enabled":false,"feature_enabled":true},"impressionData":false},{"name":"editor-private-page-search","enabled":true,"variant":{"name":"disabled","enabled":false,"feature_enabled":true},"impressionData":false},{"name":"automations-fable","enabled":true,"variant":{"name":"disabled","enabled":false,"feature_enabled":true},"impressionData":false},{"name":"fixed-ai-action-pricing","enabled":true,"variant":{"name":"disabled","enabled":false,"feature_enabled":true},"impressionData":false},{"name":"automation-resolve-merge-conflict","enabled":true,"variant":{"name":"disabled","enabled":false,"feature_enabled":true},"impressionData":false},{"name":"scoped-publishing","enabled":true,"variant":{"name":"disabled","enabled":false,"feature_enabled":true},"impressionData":false},{"name":"mintql","enabled":true,"variant":{"name":"disabled","enabled":false,"feature_enabled":true},"impressionData":false},{"name":"page-level-analytics","enabled":true,"variant":{"name":"disabled","enabled":false,"feature_enabled":true},"impressionData":false},{"name":"teamspace","enabled":true,"variant":{"name":"disabled","enabled":false,"feature_enabled":true},"impressionData":false},{"name":"editor-version-history-v2","enabled":true,"variant":{"name":"disabled","enabled":false,"feature_enabled":true},"impressionData":false},{"name":"vite-origin","enabled":true,"variant":{"name":"disabled","enabled":false,"feature_enabled":true},"impressionData":false},{"name":"editor-nav-generations","enabled":true,"variant":{"name":"disabled","enabled":false,"feature_enabled":true},"impressionData":false},{"name":"billing-page-v2","enabled":true,"variant":{"name":"disabled","enabled":false,"feature_enabled":true},"impressionData":false},{"name":"workspace-projects","enabled":true,"variant":{"name":"disabled","enabled":false,"feature_enabled":true},"impressionData":false},{"name":"assistant-v5","enabled":true,"variant":{"name":"disabled","enabled":false,"feature_enabled":true},"impressionData":false},{"name":"byok-sep-25","enabled":true,"variant":{"name":"disabled","enabled":false,"feature_enabled":true},"impressionData":false},{"name":"fork-pr-previews","enabled":true,"variant":{"name":"disabled","enabled":false,"feature_enabled":true},"impressionData":false},{"name":"revalidation-jwt","enabled":true,"variant":{"name":"disabled","enabled":false,"feature_enabled":true},"impressionData":false},{"name":"editor-agent-model-picker","enabled":true,"variant":{"name":"disabled","enabled":false,"feature_enabled":true},"impressionData":false},{"name":"client-snapshot-docs-config","enabled":true,"variant":{"name":"disabled","enabled":false,"feature_enabled":true},"impressionData":false},{"name":"hobby-abuse-scan","enabled":true,"variant":{"name":"disabled","enabled":false,"feature_enabled":true},"impressionData":false},{"name":"dashboard-inbox","enabled":true,"variant":{"name":"disabled","enabled":false,"feature_enabled":true},"impressionData":false}],"isAtlas":false,"googleFontsInlined":false},"customCss":[{"filePath":"index.css","content":":root{--background:#ffffff!important;--primary:#1a1918!important;--primary-light:#444444!important;--text-main:#1a1918!important;--text-muted:#6b7280!important;--border-color:#e5e7eb!important;--card-bg:#ffffff!important;--sidebar-bg:#fafafa!important}.dark{--background:#1a1918!important;--primary:#ffffff!important;--primary-light:#eeeeee!important;--text-main:#ffffff!important;--text-muted:#9ca3af!important;--border-color:#333333!important;--card-bg:#242322!important;--sidebar-bg:#111111!important}body{background-color:var(--background)!important}#sidebar-content,.sidebar-container{background-color:var(--sidebar-bg)!important}.logo,.logo img,a[href*=\"visibility.so\"] img,a[href=\"/\"] img,header img,nav img{height:38px!important;max-height:38px!important;width:auto!important}body,h1,h2,h3,h4,h5,h6{color:var(--text-main)!important}a{color:var(--primary)!important;text-decoration-color:var(--border-color)!important}.card,div[class*=Card]{background-color:var(--card-bg)!important;border:1px solid var(--border-color)!important}.card:hover,div[class*=Card]:hover{border-color:var(--primary)!important}code,pre{border-color:var(--border-color)!important}::-webkit-scrollbar{width:8px}::-webkit-scrollbar-track{background:var(--background)}::-webkit-scrollbar-thumb{background:var(--border-color);border-radius:4px}::-webkit-scrollbar-thumb:hover{background:var(--primary-light);border-radius:4px}#header-tabs-container .header-tab,.header-tab,nav[class*=HeaderTabs] a{font-weight:500!important;font-size:.95rem!important;padding:8px 16px!important;transition:all .25s cubic-bezier(.4,0,.2,1)!important;border-bottom:2px solid transparent!important;color:var(--text-muted)!important}#header-tabs-container .header-tab:hover,.header-tab:hover,nav[class*=HeaderTabs] a:hover{color:var(--primary)!important;opacity:1!important}#header-tabs-container .header-tab::after,.header-tab::after,.nav-tabs-item::after,.nav-tabs-item>div{display:none!important;content:none!important}.nav-tabs-item{position:relative!important;padding-bottom:0!important}.header-tab-active,.nav-tabs-item[class*=\"dark:text-gray-200\"],.nav-tabs-item[class*=text-gray-800]{color:var(--primary)!important;font-weight:600!important}.header-tab svg,.nav-tabs-item svg,nav[class*=HeaderTabs] a svg{margin-right:8px!important;width:16px!important;height:16px!important;display:inline-block!important;vertical-align:middle!important}"}],"page":{"pagePath":"projects","slug":"/projects","pageMetadata":{"title":"Projects","description":"Create a project for a client site, finish its setup, and manage its pages, integrations, refresh schedules, memory and saved sign-ins.","href":"/projects"},"description":{"compiledSource":"\"use strict\";\nconst {jsx: _jsx} = arguments[0];\nconst {useMDXComponents: _provideComponents} = arguments[0];\nfunction _createMdxContent(props) {\n const _components = {\n p: \"p\",\n ..._provideComponents(),\n ...props.components\n };\n return _jsx(_components.p, {\n children: \"Create a project for a client site, finish its setup, and manage its pages, integrations, refresh schedules, memory and saved sign-ins.\"\n });\n}\nfunction MDXContent(props = {}) {\n const {wrapper: MDXLayout} = {\n ..._provideComponents(),\n ...props.components\n };\n return MDXLayout ? _jsx(MDXLayout, {\n ...props,\n children: _jsx(_createMdxContent, {\n ...props\n })\n }) : _createMdxContent(props);\n}\nreturn {\n default: MDXContent\n};\n","frontmatter":{},"scope":{}},"pageType":"default","mdx":{"mdxSource":{"compiledSource":"\"use strict\";const{Fragment:_Fragment,jsx:_jsx,jsxs:_jsxs}=arguments[0];const{useMDXComponents:_provideComponents}=arguments[0];function _createMdxContent(props){const _components={a:`a`,code:`code`,li:`li`,p:`p`,strong:`strong`,tbody:`tbody`,td:`td`,th:`th`,thead:`thead`,tr:`tr`,ul:`ul`,..._provideComponents(),...props.components},{Frame,Heading,Note,OptimizedImage,Step,Steps,Table,Tip,Warning}=_components;if(!Frame)_missingMdxReference(`Frame`,true);if(!Heading)_missingMdxReference(`Heading`,true);if(!Note)_missingMdxReference(`Note`,true);if(!OptimizedImage)_missingMdxReference(`OptimizedImage`,true);if(!Step)_missingMdxReference(`Step`,true);if(!Steps)_missingMdxReference(`Steps`,true);if(!Table)_missingMdxReference(`Table`,true);if(!Tip)_missingMdxReference(`Tip`,true);if(!Warning)_missingMdxReference(`Warning`,true);return _jsxs(_Fragment,{children:[_jsx(_components.p,{children:`A Project is one website you track inside a Company. It holds the site’s domain, its competitors, your brand names, the topics you target and the market you sell into, and its settings decide which pages and tools are switched on for it. Tasks, keywords, reports, opportunities, content and integrations all belong to a project.`}),`\n`,_jsxs(_components.p,{children:[`Most work in Visibility happens inside one: an `,_jsx(_components.a,{href:`/agents`,children:`Agent`}),` can only work on the projects it is assigned to, and every report reads its numbers against the project’s domain.`]}),`\n`,_jsx(Heading,{level:`2`,id:`the-projects-page`,children:`The Projects page`}),`\n`,_jsxs(_components.p,{children:[`Click `,_jsx(_components.strong,{children:`Projects`}),` in the sidebar. The page is headed `,_jsx(_components.strong,{children:`Projects`}),`, with a `,_jsx(_components.strong,{children:`New project`}),` button at the top right, a count such as “3 projects”, and a `,_jsx(_components.strong,{children:`Show archived`}),` / `,_jsx(_components.strong,{children:`Hide archived`}),` toggle.`]}),`\n`,_jsxs(_components.p,{children:[`Each project is a card showing its logo or initials, its name and domain, and six metrics: sessions, clicks, AI vis. (%), keywords, open tasks and opps. A metric reads ”—” when the source behind it is not connected yet. Archived projects are dimmed and carry an `,_jsx(_components.strong,{children:`Archived`}),` label.`]}),`\n`,_jsx(Frame,{caption:`The Projects page, one card per client site with its headline metrics.`,children:_jsx(OptimizedImage,{src:`https://mintcdn.com/doableteam-a944c448/vfpuZshuNSFIBxvy/images/projects-list.jpg?fit=max\u0026auto=format\u0026n=vfpuZshuNSFIBxvy\u0026q=85\u0026s=cc8ae107ad26def49e9be0ec47fcbf34`,alt:`The Projects page showing project cards with domain, sessions, clicks, AI visibility, keywords, tasks and opportunities`,\"data-og-width\":`1568`,width:`1568`,\"data-og-height\":`782`,height:`782`,\"data-path\":`images/projects-list.jpg`,\"data-optimize\":`true`,\"data-opv\":`3`,srcset:`https://mintcdn.com/doableteam-a944c448/vfpuZshuNSFIBxvy/images/projects-list.jpg?w=280\u0026fit=max\u0026auto=format\u0026n=vfpuZshuNSFIBxvy\u0026q=85\u0026s=1426e46d03977048cc842514ca4d8ae5 280w, https://mintcdn.com/doableteam-a944c448/vfpuZshuNSFIBxvy/images/projects-list.jpg?w=560\u0026fit=max\u0026auto=format\u0026n=vfpuZshuNSFIBxvy\u0026q=85\u0026s=bb20167465285ec0c57c37e43cd15348 560w, https://mintcdn.com/doableteam-a944c448/vfpuZshuNSFIBxvy/images/projects-list.jpg?w=840\u0026fit=max\u0026auto=format\u0026n=vfpuZshuNSFIBxvy\u0026q=85\u0026s=c0e0ac4649d69ff9735231ddf278939b 840w, https://mintcdn.com/doableteam-a944c448/vfpuZshuNSFIBxvy/images/projects-list.jpg?w=1100\u0026fit=max\u0026auto=format\u0026n=vfpuZshuNSFIBxvy\u0026q=85\u0026s=f965f1103495f4ae5935723bae0f3a63 1100w, https://mintcdn.com/doableteam-a944c448/vfpuZshuNSFIBxvy/images/projects-list.jpg?w=1650\u0026fit=max\u0026auto=format\u0026n=vfpuZshuNSFIBxvy\u0026q=85\u0026s=b47bbd7ed5101f98c4ec3a9c48f304a9 1650w, https://mintcdn.com/doableteam-a944c448/vfpuZshuNSFIBxvy/images/projects-list.jpg?w=2500\u0026fit=max\u0026auto=format\u0026n=vfpuZshuNSFIBxvy\u0026q=85\u0026s=5b84a9741ea86347ded9685281073ba5 2500w`})}),`\n`,_jsxs(_components.p,{children:[`The `,_jsx(_components.strong,{children:`Projects`}),` row in the sidebar also expands into a list of your projects, with a `,_jsx(_components.strong,{children:`+`}),` (`,_jsx(_components.strong,{children:`Add project`}),`) that opens the same dialog. If you have no projects yet you see “No projects yet — Add a client site to start tracking SEO work.”`]}),`\n`,_jsx(Heading,{level:`2`,id:`creating-a-project`,children:`Creating a project`}),`\n`,_jsx(_components.p,{children:`Any member of the company can create a project. Only the name is required.`}),`\n`,_jsxs(Steps,{children:[_jsx(Step,{title:`Open the New project dialog`,children:_jsxs(_components.p,{children:[`Click `,_jsx(_components.strong,{children:`New project`}),` on the Projects page, the `,_jsx(_components.strong,{children:`+`}),` beside `,_jsx(_components.strong,{children:`Projects`}),` in the sidebar, `,_jsx(_components.strong,{children:`New project`}),` in the project switcher, or press Ctrl/⌘ K and choose the new-project action.`]})}),_jsx(Step,{title:`Name the project`,children:_jsxs(_components.p,{children:[`Type a `,_jsx(_components.strong,{children:`Project name`}),` (up to 200 characters). Pressing Enter here creates the project straight away.`]})}),_jsx(Step,{title:`Describe it`,children:_jsx(_components.p,{children:`The description is optional but worth writing: agents working on this project’s tasks receive the name and description as context. Write it like a brief for a new teammate — audience, tone, goals and constraints. Up to 2,000 characters.`})}),_jsx(Step,{title:`Enter your domain`,children:_jsxs(_components.p,{children:[`Under `,_jsx(_components.strong,{children:`SEO Configuration`}),`, type `,_jsx(_components.strong,{children:`Your domain`}),` — either a bare host such as `,_jsx(_components.code,{children:`yourbrand.com`}),` or an `,_jsx(_components.code,{children:`https://`}),` address. Read the notice beside it: this is a one-time setting. An `,_jsx(_components.code,{children:`http://`}),` address is rejected with “Use https:// — an http:// address isn’t accepted”.`]})}),_jsx(Step,{title:`Add competitor domains`,children:_jsx(_components.p,{children:`Type a competitor domain and press Enter, or paste a comma-separated list. Each entry is checked for being a real domain, and duplicates are dropped. You can add up to 50.`})}),_jsx(Step,{title:`Assign people and agents`,children:_jsxs(_components.p,{children:[`Under `,_jsx(_components.strong,{children:`Assign people \u0026 agents`}),`, use `,_jsx(_components.strong,{children:`Search people and agents…`}),` to pick teammates and agents, or use the `,_jsx(_components.strong,{children:`Assign all agents`}),` row. Agents only work on the projects they are assigned to.`]})}),_jsx(Step,{title:`Create it`,children:_jsxs(_components.p,{children:[`Click `,_jsx(_components.strong,{children:`Create project`}),`. You land on the new project’s Overview.`]})})]}),`\n`,_jsxs(_components.p,{children:[`Every feature is switched on for a new project; narrow it down later in `,_jsx(_components.strong,{children:`Settings → Features`}),`. The dialog keeps your draft across a page refresh, and `,_jsx(_components.strong,{children:`Discard`}),` clears it.`]}),`\n`,_jsx(Note,{children:_jsx(_components.p,{children:`Assigning people records who is responsible for the project. It does not hide the project from your other teammates. Up to 50 people can be assigned.`})}),`\n`,_jsxs(_components.p,{children:[`Your plan sets how many projects a company can have: 3 on Starter and 6 on Growth, counting only projects that are not archived. Past that you see “You’ve reached your plan’s project limit — This plan allows up to N projects. Upgrade to add more.” See `,_jsx(_components.a,{href:`/billing-and-subscriptions`,children:`Billing and subscriptions`}),`. A company that has not finished onboarding is asked to “Finish setting up the workspace before creating projects.”`]}),`\n`,_jsx(Heading,{level:`3`,id:`let-ai-write-the-description`,children:`Let AI write the description`}),`\n`,_jsx(_components.p,{children:`Where this is available on your workspace, the sparkle button beside the description writes it for you from the site itself.`}),`\n`,_jsxs(Steps,{children:[_jsx(Step,{title:`Fill in the name and domain`,children:_jsx(_components.p,{children:`The sparkle button stays disabled until the project has a name and a valid domain; its tooltip names whatever is still missing.`})}),_jsx(Step,{title:`Click the sparkle button`,children:_jsxs(_components.p,{children:[`Its label is `,_jsx(_components.strong,{children:`Write this description with AI`}),`.`]})}),_jsx(Step,{title:`Confirm`,children:_jsxs(_components.p,{children:[`The dialog asks “Write the description with AI?” and explains that it will read your domain and summarise it. It warns you if this would replace text you have already written. Click `,_jsx(_components.strong,{children:`Generate`}),`.`]})}),_jsx(Step,{title:`Wait, then edit`,children:_jsx(_components.p,{children:`You see “Reading your domain… This takes a few seconds — please don’t close this window.” The dialog can’t be closed while it works. The finished text lands in the description field and is yours to edit before you create the project.`})})]}),`\n`,_jsx(_components.p,{children:`If the site can’t be read you see, against the domain field, “We couldn’t read this domain, so the description couldn’t be generated. Check it’s correct and publicly reachable.” A generated description is capped at 1,200 characters, and generating them is rate-limited per person.`}),`\n`,_jsx(Heading,{level:`2`,id:`your-domain-is-a-one-time-setting`,children:`Your domain is a one-time setting`}),`\n`,_jsx(_components.p,{children:`The domain is what every number in the project is measured against, so it locks as soon as there is anything to measure.`}),`\n`,_jsxs(_components.ul,{children:[`\n`,_jsxs(_components.li,{children:[`While no data has been collected, the `,_jsx(_components.strong,{children:`Domain`}),` field in `,_jsx(_components.strong,{children:`Settings → General`}),` is editable and shows “Set this carefully — it’s a one-time setting”.`]}),`\n`,_jsx(_components.li,{children:`Once any rankings, AI answers, opportunities, backlinks or traffic exist, the field turns read-only: “The domain is fixed for this project — Data has already been collected… To track a different site, create a new project — this one keeps its history.”`}),`\n`]}),`\n`,_jsxs(_components.p,{children:[`Tidying the same host — fixing the capitalisation, adding or dropping `,_jsx(_components.code,{children:`www.`}),`, adding `,_jsx(_components.code,{children:`https://`}),` — is not treated as a change. A rebrand or a genuinely different site means a new project, and the old one keeps its history.`]}),`\n`,_jsx(Heading,{level:`2`,id:`the-project-sidebar`,children:`The project sidebar`}),`\n`,_jsxs(_components.p,{children:[`Open a project and the company sidebar collapses to an icon rail, with a second sidebar for the project beside it. At the top are a back arrow (`,_jsx(_components.strong,{children:`All projects`}),`) and a project switcher listing your projects, `,_jsx(_components.strong,{children:`All projects`}),` and `,_jsx(_components.strong,{children:`New project`}),`. Switching projects from that dropdown keeps you on the same section.`]}),`\n`,_jsxs(Table,{children:[_jsx(_components.thead,{children:_jsxs(_components.tr,{children:[_jsx(_components.th,{children:`Section`}),_jsx(_components.th,{children:`What it is`})]})}),_jsxs(_components.tbody,{children:[_jsxs(_components.tr,{children:[_jsx(_components.td,{children:_jsx(_components.strong,{children:`Overview`})}),_jsx(_components.td,{children:`The project’s report summaries and its setup checklist. Always present.`})]}),_jsxs(_components.tr,{children:[_jsx(_components.td,{children:_jsx(_components.strong,{children:`Tasks`})}),_jsxs(_components.td,{children:[`This project’s tasks. See `,_jsx(_components.a,{href:`/tasks`,children:`Tasks`}),`. Always present.`]})]}),_jsxs(_components.tr,{children:[_jsx(_components.td,{children:_jsx(_components.strong,{children:`Reports`})}),_jsxs(_components.td,{children:[`A collapsible group: `,_jsx(_components.strong,{children:`Tasks Overview`}),`, `,_jsx(_components.strong,{children:`Keyword Ranking`}),`, `,_jsx(_components.strong,{children:`AI Visibility`}),`, `,_jsx(_components.strong,{children:`Organic Traffic`}),` and `,_jsx(_components.strong,{children:`Custom Dashboards`}),`. See `,_jsx(_components.a,{href:`/tasks#the-tasks-overview-report`,children:`Tasks Overview`}),`, `,_jsx(_components.a,{href:`/keyword-rankings`,children:`Keyword rankings`}),`, `,_jsx(_components.a,{href:`/ai-visibility`,children:`AI visibility`}),`, `,_jsx(_components.a,{href:`/organic-traffic`,children:`Organic traffic`}),` and `,_jsx(_components.a,{href:`/dashboards`,children:`Dashboards`}),`.`]})]}),_jsxs(_components.tr,{children:[_jsx(_components.td,{children:_jsx(_components.strong,{children:`Opportunities`})}),_jsxs(_components.td,{children:[`Findings to act on. See `,_jsx(_components.a,{href:`/opportunities`,children:`Opportunities`}),`.`]})]}),_jsxs(_components.tr,{children:[_jsx(_components.td,{children:_jsx(_components.strong,{children:`Content`})}),_jsxs(_components.td,{children:[`The content workflow. See `,_jsx(_components.a,{href:`/content-and-wordpress`,children:`Content and WordPress`}),`.`]})]}),_jsxs(_components.tr,{children:[_jsx(_components.td,{children:_jsx(_components.strong,{children:`Link building`})}),_jsxs(_components.td,{children:[`Outreach and backlinks. See `,_jsx(_components.a,{href:`/link-building`,children:`Link building`}),`.`]})]}),_jsxs(_components.tr,{children:[_jsx(_components.td,{children:_jsx(_components.strong,{children:`Settings`})}),_jsx(_components.td,{children:`The six settings tabs below. Always present.`})]})]})]}),`\n`,_jsxs(_components.p,{children:[`The `,_jsx(_components.strong,{children:`Reports`}),` group appears while the `,_jsx(_components.strong,{children:`Overview report`}),` feature is on, and each report page inside it follows its own toggle — `,_jsx(_components.strong,{children:`Tasks Overview`}),` and `,_jsx(_components.strong,{children:`Custom Dashboards`}),` are always available. `,_jsx(_components.strong,{children:`Opportunities`}),`, `,_jsx(_components.strong,{children:`Content`}),` and `,_jsx(_components.strong,{children:`Link building`}),` appear when their toggles are on.`]}),`\n`,_jsx(Heading,{level:`2`,id:`the-project-overview`,children:`The project Overview`}),`\n`,_jsxs(_components.p,{children:[`The Overview is the project’s front page: the project name, a date filter, and stacked report summaries — `,_jsx(_components.strong,{children:`Tasks`}),` and `,_jsx(_components.strong,{children:`Site authority`}),` side by side, then `,_jsx(_components.strong,{children:`Keyword ranking`}),`, `,_jsx(_components.strong,{children:`AI visibility`}),` and `,_jsx(_components.strong,{children:`Organic traffic`}),`. Each section carries a button through to the full report and a “Last checked” or “Last run” stamp.`]}),`\n`,_jsx(Frame,{caption:`The project Overview: the setup bar, then a summary of each enabled report.`,children:_jsx(OptimizedImage,{src:`https://mintcdn.com/doableteam-a944c448/vfpuZshuNSFIBxvy/images/project-overview.jpg?fit=max\u0026auto=format\u0026n=vfpuZshuNSFIBxvy\u0026q=85\u0026s=3674e6a58e936aeb42b8168f7e7acff3`,alt:`The project Overview with the date filter, setup bar, Tasks and Site authority cards and the keyword ranking section`,\"data-og-width\":`1568`,width:`1568`,\"data-og-height\":`782`,height:`782`,\"data-path\":`images/project-overview.jpg`,\"data-optimize\":`true`,\"data-opv\":`3`,srcset:`https://mintcdn.com/doableteam-a944c448/vfpuZshuNSFIBxvy/images/project-overview.jpg?w=280\u0026fit=max\u0026auto=format\u0026n=vfpuZshuNSFIBxvy\u0026q=85\u0026s=7c7cba9ba25cc098abcf100205bf8783 280w, https://mintcdn.com/doableteam-a944c448/vfpuZshuNSFIBxvy/images/project-overview.jpg?w=560\u0026fit=max\u0026auto=format\u0026n=vfpuZshuNSFIBxvy\u0026q=85\u0026s=7a0c9ab7cfc2042d3a24ef67fedf3aba 560w, https://mintcdn.com/doableteam-a944c448/vfpuZshuNSFIBxvy/images/project-overview.jpg?w=840\u0026fit=max\u0026auto=format\u0026n=vfpuZshuNSFIBxvy\u0026q=85\u0026s=a05e380599cf4cfce0630ede977acd7b 840w, https://mintcdn.com/doableteam-a944c448/vfpuZshuNSFIBxvy/images/project-overview.jpg?w=1100\u0026fit=max\u0026auto=format\u0026n=vfpuZshuNSFIBxvy\u0026q=85\u0026s=538f158fe41e077d4550dfd375a2d51a 1100w, https://mintcdn.com/doableteam-a944c448/vfpuZshuNSFIBxvy/images/project-overview.jpg?w=1650\u0026fit=max\u0026auto=format\u0026n=vfpuZshuNSFIBxvy\u0026q=85\u0026s=45b39eab14f391b4f2dcccdbbbdf5e8d 1650w, https://mintcdn.com/doableteam-a944c448/vfpuZshuNSFIBxvy/images/project-overview.jpg?w=2500\u0026fit=max\u0026auto=format\u0026n=vfpuZshuNSFIBxvy\u0026q=85\u0026s=95e7383a21a233ad6ecdea56b85e8b28 2500w`})}),`\n`,_jsxs(_components.p,{children:[`Use the date filter in the header to choose `,_jsx(_components.strong,{children:`7d`}),`, `,_jsx(_components.strong,{children:`30d`}),`, `,_jsx(_components.strong,{children:`90d`}),`, `,_jsx(_components.strong,{children:`1y`}),` or `,_jsx(_components.strong,{children:`Custom`}),` (a start and end date up to 365 days apart). The default is 30d. Every section follows the same window, and your choice is kept in the page address, so a link shares the same view.`]}),`\n`,_jsxs(_components.p,{children:[_jsx(_components.strong,{children:`Site authority`}),` shows Domain Rating, a 0–100 score provided by Ahrefs, as a ring for your domain next to the same score for each competitor domain. `,_jsx(_components.strong,{children:`Unrated`}),` means the score is unknown, not zero.`]}),`\n`,_jsx(Heading,{level:`3`,id:`the-setup-checklist`,children:`The setup checklist`}),`\n`,_jsx(_components.p,{children:`Until a project is fully set up, a one-line bar under the header shows your progress, for example “2/6”, with either the one thing that is missing or “4 things left to set up”.`}),`\n`,_jsxs(Steps,{children:[_jsx(Step,{title:`Open the checklist`,children:_jsx(_components.p,{children:`Click the bar. It opens “Finish setting up this project — Each one turns on something the reports and agents can use.”`})}),_jsx(Step,{title:`Work through the outstanding rows`,children:_jsxs(_components.p,{children:[`Each row says what it unlocks and links straight to where it is fixed: `,_jsx(_components.strong,{children:`Set the project’s domain`}),`, `,_jsx(_components.strong,{children:`Add your brand names`}),` and `,_jsx(_components.strong,{children:`Add competitor domains`}),` go to `,_jsx(_components.strong,{children:`Settings → General`}),`; `,_jsx(_components.strong,{children:`Add keywords to track`}),` goes to the Keyword Ranking page; `,_jsx(_components.strong,{children:`Connect Search Console`}),` and `,_jsx(_components.strong,{children:`Connect Google Analytics`}),` go to `,_jsx(_components.strong,{children:`Settings → Integrations`}),`.`]})}),_jsx(Step,{title:`Finish`,children:_jsx(_components.p,{children:`When every item is done the bar disappears.`})})]}),`\n`,_jsx(_components.p,{children:`Only items that serve a feature you have switched on are listed — a project with AI visibility off is never asked for brand names.`}),`\n`,_jsx(Heading,{level:`2`,id:`settings`,children:`Settings`}),`\n`,_jsxs(_components.p,{children:[`Open `,_jsx(_components.strong,{children:`Settings`}),` in the project sidebar. The header reads the project name followed by `,_jsx(_components.strong,{children:`Settings`}),`, with a tab row: `,_jsx(_components.strong,{children:`General`}),`, `,_jsx(_components.strong,{children:`Features`}),`, `,_jsx(_components.strong,{children:`Integrations`}),`, `,_jsx(_components.strong,{children:`Schedules`}),`, `,_jsx(_components.strong,{children:`Memory`}),` and `,_jsx(_components.strong,{children:`Sign-ins`}),`. Each tab has its own address, so you can link straight to one.`]}),`\n`,_jsxs(Table,{children:[_jsx(_components.thead,{children:_jsxs(_components.tr,{children:[_jsx(_components.th,{children:`Tab`}),_jsx(_components.th,{children:`Who can change it`})]})}),_jsxs(_components.tbody,{children:[_jsxs(_components.tr,{children:[_jsxs(_components.td,{children:[_jsx(_components.strong,{children:`General`}),`, `,_jsx(_components.strong,{children:`Features`}),`, `,_jsx(_components.strong,{children:`Memory`}),`, `,_jsx(_components.strong,{children:`Sign-ins`}),`, assigned agents, archive and delete`]}),_jsxs(_components.td,{children:[`The `,_jsx(_components.strong,{children:`Manage company`}),` permission (Admin by default). `,_jsx(_components.strong,{children:`Sign-ins`}),` is admins only.`]})]}),_jsxs(_components.tr,{children:[_jsx(_components.td,{children:_jsx(_components.strong,{children:`Integrations`})}),_jsxs(_components.td,{children:[`The `,_jsx(_components.strong,{children:`Manage integrations`}),` permission (Admin and Manager by default).`]})]}),_jsxs(_components.tr,{children:[_jsx(_components.td,{children:_jsx(_components.strong,{children:`Schedules`})}),_jsx(_components.td,{children:`Any member can view, edit and run them.`})]})]})]}),`\n`,_jsxs(_components.p,{children:[`Members without the permission still see the settings, read-only: General shows a `,_jsx(_components.strong,{children:`Details`}),` card with the note “Only workspace admins can change these — ask one if something here needs updating.” See `,_jsx(_components.a,{href:`/team-management`,children:`Team management`}),` for roles and permissions.`]}),`\n`,_jsx(Heading,{level:`3`,id:`general`,children:`General`}),`\n`,_jsx(Frame,{caption:`Settings → General, with the SEO + GEO block for competitors, brand names, topics and location.`,children:_jsx(OptimizedImage,{src:`https://mintcdn.com/doableteam-a944c448/vfpuZshuNSFIBxvy/images/project-settings.jpg?fit=max\u0026auto=format\u0026n=vfpuZshuNSFIBxvy\u0026q=85\u0026s=ad7cc1597e389e38494ee91402e0e30e`,alt:`The General settings tab showing name, description, domain, target date, logo and the SEO and GEO fields`,\"data-og-width\":`1568`,width:`1568`,\"data-og-height\":`782`,height:`782`,\"data-path\":`images/project-settings.jpg`,\"data-optimize\":`true`,\"data-opv\":`3`,srcset:`https://mintcdn.com/doableteam-a944c448/vfpuZshuNSFIBxvy/images/project-settings.jpg?w=280\u0026fit=max\u0026auto=format\u0026n=vfpuZshuNSFIBxvy\u0026q=85\u0026s=1ff7ac24c1732155931bc1e33ca19f1a 280w, https://mintcdn.com/doableteam-a944c448/vfpuZshuNSFIBxvy/images/project-settings.jpg?w=560\u0026fit=max\u0026auto=format\u0026n=vfpuZshuNSFIBxvy\u0026q=85\u0026s=24ec469e62ce2de76d00d9be72a74a41 560w, https://mintcdn.com/doableteam-a944c448/vfpuZshuNSFIBxvy/images/project-settings.jpg?w=840\u0026fit=max\u0026auto=format\u0026n=vfpuZshuNSFIBxvy\u0026q=85\u0026s=c217c9f521d9493c4966015d63ad9f12 840w, https://mintcdn.com/doableteam-a944c448/vfpuZshuNSFIBxvy/images/project-settings.jpg?w=1100\u0026fit=max\u0026auto=format\u0026n=vfpuZshuNSFIBxvy\u0026q=85\u0026s=ebcd6d8b2517606a7846ca08199f3ea2 1100w, https://mintcdn.com/doableteam-a944c448/vfpuZshuNSFIBxvy/images/project-settings.jpg?w=1650\u0026fit=max\u0026auto=format\u0026n=vfpuZshuNSFIBxvy\u0026q=85\u0026s=9d079b32deb0f09b7f076cf4b9dd96d3 1650w, https://mintcdn.com/doableteam-a944c448/vfpuZshuNSFIBxvy/images/project-settings.jpg?w=2500\u0026fit=max\u0026auto=format\u0026n=vfpuZshuNSFIBxvy\u0026q=85\u0026s=6cb62a184bf20e955cd925a9f7ae0ff0 2500w`})}),`\n`,_jsxs(_components.p,{children:[`The `,_jsx(_components.strong,{children:`General`}),` form saves with `,_jsx(_components.strong,{children:`Save changes`}),` and applies immediately (“Project saved”).`]}),`\n`,_jsxs(Table,{children:[_jsx(_components.thead,{children:_jsxs(_components.tr,{children:[_jsx(_components.th,{children:`Field`}),_jsx(_components.th,{children:`What it is for`})]})}),_jsxs(_components.tbody,{children:[_jsxs(_components.tr,{children:[_jsxs(_components.td,{children:[_jsx(_components.strong,{children:`Name`}),` and `,_jsx(_components.strong,{children:`Description`})]}),_jsx(_components.td,{children:`How the project appears, and the standing brief every agent receives with its tasks.`})]}),_jsxs(_components.tr,{children:[_jsx(_components.td,{children:_jsx(_components.strong,{children:`Domain`})}),_jsx(_components.td,{children:`The site being optimised. Editable until data has been collected, then fixed (see above).`})]}),_jsxs(_components.tr,{children:[_jsx(_components.td,{children:_jsx(_components.strong,{children:`Target date`})}),_jsx(_components.td,{children:`A calendar date you are working towards, shown on the project.`})]}),_jsxs(_components.tr,{children:[_jsx(_components.td,{children:_jsx(_components.strong,{children:`Logo`})}),_jsxs(_components.td,{children:[`Hover the logo square, click the camera button and pick an image. It saves at once (“Logo updated”); `,_jsx(_components.strong,{children:`Remove`}),` clears it. Square works best — it is resized to a 160px square before saving.`]})]})]})]}),`\n`,_jsxs(_components.p,{children:[`The `,_jsx(_components.strong,{children:`SEO + GEO`}),` block holds the inputs that drive both SEO workflows and AI-visibility tracking:`]}),`\n`,_jsxs(_components.ul,{children:[`\n`,_jsxs(_components.li,{children:[_jsx(_components.strong,{children:`Competitor domains`}),` — press Enter or type a comma to add one; each is validated. Up to 50. Used for share of voice, AI-visibility comparisons, the Site authority card and the competitor gap detectors.`]}),`\n`,_jsxs(_components.li,{children:[_jsx(_components.strong,{children:`Brand names`}),` — press Enter to add. Commas are kept, so “Smith, Jones \u0026 Co” stays one name. These are the names AI-visibility checks look for in assistant answers. Up to 50, each up to 200 characters.`]}),`\n`,_jsxs(_components.li,{children:[_jsx(_components.strong,{children:`Suggested competitors`}),` — pills for domains the AI assistants named in this project’s answers, six at a time with `,_jsx(_components.strong,{children:`Show N more`}),`. Click one to add it. Directories are listed separately with the note that they are better as citation targets than competitors, and adding one removes it from your AI Citations tab.`]}),`\n`,_jsxs(_components.li,{children:[_jsx(_components.strong,{children:`Topics`}),` — the subject areas the project targets, used by AI visibility. Up to 50.`]}),`\n`,_jsxs(_components.li,{children:[_jsx(_components.strong,{children:`Location`}),` — the market you are tracking, either a country or `,_jsx(_components.code,{children:`City, Region, Country`}),`.`]}),`\n`]}),`\n`,_jsx(Warning,{children:_jsx(_components.p,{children:`A brand name of three characters or fewer, or an everyday word such as “store”, “app” or “design”, shows an amber warning. Such names match unrelated text in assistant answers and will overstate your visibility. Use the name people actually search for.`})}),`\n`,_jsxs(_components.p,{children:[`Below the form, the `,_jsx(_components.strong,{children:`Agents`}),` card is the project’s agent access list: only the agents ticked here can work on this project, and an empty list means none can. Tick them in the multi-select or use `,_jsx(_components.strong,{children:`Assign all agents`}),`, then click `,_jsx(_components.strong,{children:`Save`}),` (“Assigned agents updated”). Removing an agent revokes its access immediately; assigning it a task on this project grants access again. This is enforced everywhere, not just in the interface.`]}),`\n`,_jsx(Heading,{level:`3`,id:`features`,children:`Features`}),`\n`,_jsxs(_components.p,{children:[_jsx(_components.strong,{children:`Features`}),` decides which pages and tools this project has. Toggles save instantly and the project sidebar updates to match.`]}),`\n`,_jsxs(Table,{children:[_jsx(_components.thead,{children:_jsxs(_components.tr,{children:[_jsx(_components.th,{children:`Group`}),_jsx(_components.th,{children:`Toggles`})]})}),_jsxs(_components.tbody,{children:[_jsxs(_components.tr,{children:[_jsx(_components.td,{children:`—`}),_jsxs(_components.td,{children:[_jsx(_components.strong,{children:`Overview report`}),` — the Overview’s report sections and the Reports group.`]})]}),_jsxs(_components.tr,{children:[_jsx(_components.td,{children:_jsx(_components.strong,{children:`Pages`})}),_jsxs(_components.td,{children:[_jsx(_components.strong,{children:`Keywords`}),`, `,_jsx(_components.strong,{children:`AI visibility`}),`, `,_jsx(_components.strong,{children:`Organic traffic`}),`, `,_jsx(_components.strong,{children:`Opportunities`}),`. Each enabled page appears in this project’s sidebar.`]})]}),_jsxs(_components.tr,{children:[_jsx(_components.td,{children:_jsx(_components.strong,{children:`Workflows`})}),_jsxs(_components.td,{children:[_jsx(_components.strong,{children:`Content`}),`, with sub-toggles `,_jsx(_components.strong,{children:`Planner`}),`, `,_jsx(_components.strong,{children:`Tasks`}),` and `,_jsx(_components.strong,{children:`Database`}),`; `,_jsx(_components.strong,{children:`Link building`}),`, with `,_jsx(_components.strong,{children:`Activities`}),`, `,_jsx(_components.strong,{children:`Tasks`}),` and `,_jsx(_components.strong,{children:`Database`}),`.`]})]})]})]}),`\n`,_jsx(Tip,{children:_jsx(_components.p,{children:`Turning a page off hides it and its Overview section but deletes nothing — switch it back on any time and the data is still there. Overview, Tasks, Custom Dashboards and Settings can’t be hidden, and WordPress has no toggle: it is available whenever a site is connected under Integrations.`})}),`\n`,_jsx(Heading,{level:`3`,id:`integrations`,children:`Integrations`}),`\n`,_jsxs(_components.p,{children:[_jsx(_components.strong,{children:`Integrations`}),` is where you connect the data sources this project uses: `,_jsx(_components.strong,{children:`Google Analytics`}),`, `,_jsx(_components.strong,{children:`Google Search Console`}),` and `,_jsx(_components.strong,{children:`WordPress`}),`. Each card shows a status badge (`,_jsx(_components.strong,{children:`Connected`}),`, `,_jsx(_components.strong,{children:`Choose property`}),`, `,_jsx(_components.strong,{children:`Choose site`}),`, `,_jsx(_components.strong,{children:`Reconnect`}),`) and the connected property or site name. Buttons you don’t have permission to use stay visible but disabled, with a tooltip explaining why.`]}),`\n`,_jsxs(_components.ul,{children:[`\n`,_jsxs(_components.li,{children:[_jsx(_components.strong,{children:`Google Analytics`}),` — click `,_jsx(_components.strong,{children:`Connect`}),`, approve read access on Google’s screen, then click `,_jsx(_components.strong,{children:`Choose property`}),` and pick a GA4 property. Use `,_jsx(_components.strong,{children:`Change property`}),` to repoint it or `,_jsx(_components.strong,{children:`Disconnect`}),` to remove it.`]}),`\n`,_jsxs(_components.li,{children:[_jsx(_components.strong,{children:`Google Search Console`}),` — click `,_jsx(_components.strong,{children:`Connect`}),`, approve on Google’s screen, then click `,_jsx(_components.strong,{children:`Choose site`}),` and pick a verified site. If the Google account has none, the picker says “No verified sites on this Google account.”`]}),`\n`,_jsxs(_components.li,{children:[_jsx(_components.strong,{children:`WordPress`}),` — click `,_jsx(_components.strong,{children:`Connect`}),`, install the `,_jsx(_components.strong,{children:`Agentic SEO for Visibility`}),` plugin on your site, then click `,_jsx(_components.strong,{children:`Generate pairing code`}),` and paste the code into the plugin. Once paired, the card shows the site name and reminds you that publish requests are approved in `,_jsx(_components.strong,{children:`Inbox → Approvals`}),`.`]}),`\n`]}),`\n`,_jsxs(_components.p,{children:[`Only the teammate whose Google account made a connection can change its property or site; anyone with `,_jsx(_components.strong,{children:`Manage integrations`}),` can disconnect and reconnect with their own account. If access is lost, the badge turns red with `,_jsx(_components.strong,{children:`Reconnect`}),` and a plain-English reason. Organic traffic renders with either Google Analytics or Search Console alone — neither one needs the other.`]}),`\n`,_jsxs(_components.p,{children:[`Full setup instructions live in `,_jsx(_components.a,{href:`/integrations`,children:`Integrations`}),`; publishing is covered in `,_jsx(_components.a,{href:`/content-and-wordpress`,children:`Content and WordPress`}),` and approvals in `,_jsx(_components.a,{href:`/inbox-and-approvals`,children:`Inbox and approvals`}),`.`]}),`\n`,_jsx(Note,{children:_jsxs(_components.p,{children:[`Bringing your own DataForSEO key is a company-wide choice, not a project one. It lives under `,_jsx(_components.strong,{children:`Company settings → AI clients → Data providers`}),`. See `,_jsx(_components.a,{href:`/credits-and-byok`,children:`Credits and BYOK`}),`.`]})}),`\n`,_jsx(Heading,{level:`3`,id:`schedules`,children:`Schedules`}),`\n`,_jsxs(_components.p,{children:[_jsx(_components.strong,{children:`Schedules`}),` is where you decide how often the platform refreshes each SEO data source. All times are in UTC. The tab has two inner views: `,_jsx(_components.strong,{children:`Overview`}),`, with a card per job, and `,_jsx(_components.strong,{children:`History`}),`.`]}),`\n`,_jsx(Frame,{caption:`Settings → Schedules: a card per data source with its schedule, credit estimate and Run now.`,children:_jsx(OptimizedImage,{src:`https://mintcdn.com/doableteam-a944c448/vfpuZshuNSFIBxvy/images/project-schedules.jpg?fit=max\u0026auto=format\u0026n=vfpuZshuNSFIBxvy\u0026q=85\u0026s=995a4a9f8fb69dedabca437904a5a94a`,alt:`The Schedules tab showing job cards with Active badges, schedules in words, credit estimates and Run now buttons`,\"data-og-width\":`1568`,width:`1568`,\"data-og-height\":`782`,height:`782`,\"data-path\":`images/project-schedules.jpg`,\"data-optimize\":`true`,\"data-opv\":`3`,srcset:`https://mintcdn.com/doableteam-a944c448/vfpuZshuNSFIBxvy/images/project-schedules.jpg?w=280\u0026fit=max\u0026auto=format\u0026n=vfpuZshuNSFIBxvy\u0026q=85\u0026s=d297f535ef179d434297db4aa6da6b22 280w, https://mintcdn.com/doableteam-a944c448/vfpuZshuNSFIBxvy/images/project-schedules.jpg?w=560\u0026fit=max\u0026auto=format\u0026n=vfpuZshuNSFIBxvy\u0026q=85\u0026s=be24338660b3719847566ae62d6add74 560w, https://mintcdn.com/doableteam-a944c448/vfpuZshuNSFIBxvy/images/project-schedules.jpg?w=840\u0026fit=max\u0026auto=format\u0026n=vfpuZshuNSFIBxvy\u0026q=85\u0026s=29397a4a05009fd1614cfa6e1650fad6 840w, https://mintcdn.com/doableteam-a944c448/vfpuZshuNSFIBxvy/images/project-schedules.jpg?w=1100\u0026fit=max\u0026auto=format\u0026n=vfpuZshuNSFIBxvy\u0026q=85\u0026s=84756ccf4eb237ab1f1407f7b1135dd4 1100w, https://mintcdn.com/doableteam-a944c448/vfpuZshuNSFIBxvy/images/project-schedules.jpg?w=1650\u0026fit=max\u0026auto=format\u0026n=vfpuZshuNSFIBxvy\u0026q=85\u0026s=d1cd5a99ecabb1c031447284259fc4c3 1650w, https://mintcdn.com/doableteam-a944c448/vfpuZshuNSFIBxvy/images/project-schedules.jpg?w=2500\u0026fit=max\u0026auto=format\u0026n=vfpuZshuNSFIBxvy\u0026q=85\u0026s=5da5175145bc41d09f3a0f529ec2399f 2500w`})}),`\n`,_jsx(_components.p,{children:`There are seven jobs:`}),`\n`,_jsxs(Table,{children:[_jsx(_components.thead,{children:_jsxs(_components.tr,{children:[_jsx(_components.th,{children:`Job`}),_jsx(_components.th,{children:`What it refreshes`})]})}),_jsxs(_components.tbody,{children:[_jsxs(_components.tr,{children:[_jsx(_components.td,{children:_jsx(_components.strong,{children:`Keyword Rankings`})}),_jsx(_components.td,{children:`SERP positions for tracked keywords.`})]}),_jsxs(_components.tr,{children:[_jsx(_components.td,{children:_jsx(_components.strong,{children:`AI Visibility`})}),_jsx(_components.td,{children:`AI-assistant visibility checks. Weekly minimum.`})]}),_jsxs(_components.tr,{children:[_jsx(_components.td,{children:_jsx(_components.strong,{children:`Organic Traffic`})}),_jsx(_components.td,{children:`Organic sessions from Google Analytics.`})]}),_jsxs(_components.tr,{children:[_jsx(_components.td,{children:_jsx(_components.strong,{children:`Content Opportunities`})}),_jsx(_components.td,{children:`Content gaps from Search Console.`})]}),_jsxs(_components.tr,{children:[_jsx(_components.td,{children:_jsx(_components.strong,{children:`Competitor Content Gaps`})}),_jsx(_components.td,{children:`Content your competitors cover and you don’t.`})]}),_jsxs(_components.tr,{children:[_jsx(_components.td,{children:_jsx(_components.strong,{children:`Competitor Link Gaps`})}),_jsx(_components.td,{children:`Links your competitors have and you don’t.`})]}),_jsxs(_components.tr,{children:[_jsx(_components.td,{children:_jsx(_components.strong,{children:`AI Citation Gaps`})}),_jsx(_components.td,{children:`Sources AI assistants cite that don’t mention you.`})]})]})]}),`\n`,_jsxs(_components.p,{children:[`Each card shows the job’s title, an `,_jsx(_components.strong,{children:`Active`}),` or `,_jsx(_components.strong,{children:`Inactive`}),` badge, the schedule in words (“Every Monday at 09:00 UTC” or “Not scheduled”), `,_jsx(_components.strong,{children:`Next`}),` and `,_jsx(_components.strong,{children:`Last`}),` times, an estimate such as “~55 Credits est. / run”, and the outcome of the last run. Active cards also carry `,_jsx(_components.strong,{children:`Run now`}),` and `,_jsx(_components.strong,{children:`Edit`}),`. An Inactive card lists what the job still needs before it can run — a project domain, a tracked keyword, a connected property, a competitor — each with a link to fix it.`]}),`\n`,_jsxs(_components.p,{children:[`New projects start with Keyword Rankings, Content Opportunities and the three gap detectors refreshing weekly, and Organic Traffic twice a day. If a card reads `,_jsx(_components.strong,{children:`Not scheduled`}),`, click `,_jsx(_components.strong,{children:`Edit`}),` to give it a day and time.`]}),`\n`,_jsx(Heading,{level:`4`,id:`change-a-schedule`,children:`Change a schedule`}),`\n`,_jsxs(Steps,{children:[_jsx(Step,{title:`Open the editor`,children:_jsxs(_components.p,{children:[`On an Active card click `,_jsx(_components.strong,{children:`Edit`}),`. The dialog is headed with the job name and “How often the platform refreshes this data source.”`]})}),_jsx(Step,{title:`Pick a frequency`,children:_jsxs(_components.p,{children:[`Choose `,_jsx(_components.strong,{children:`Off`}),`, `,_jsx(_components.strong,{children:`Hourly`}),`, `,_jsx(_components.strong,{children:`Daily`}),`, `,_jsx(_components.strong,{children:`Weekly`}),`, `,_jsx(_components.strong,{children:`Monthly`}),` or `,_jsx(_components.strong,{children:`Custom`}),`. AI Visibility and the three gap detectors are not offered Hourly or Daily; their dialog adds “This source runs weekly at most.”`]})}),_jsx(Step,{title:`Set the time`,children:_jsx(_components.p,{children:`Pick an hour (00–23) and a minute (:00, :15, :30 or :45) in UTC, plus a day of the week for Weekly or a day of the month (1–28) for Monthly. A summary line previews the result, for example “Every Monday at 09:00”.`})}),_jsx(Step,{title:`Save`,children:_jsxs(_components.p,{children:[`Click `,_jsx(_components.strong,{children:`Save`}),`. The card shows the new schedule and its next run.`]})})]}),`\n`,_jsx(Heading,{level:`4`,id:`run-a-check-now`,children:`Run a check now`}),`\n`,_jsxs(Steps,{children:[_jsx(Step,{title:`Check the estimate`,children:_jsxs(_components.p,{children:[`Find the job — it must be `,_jsx(_components.strong,{children:`Active`}),` — and read the “~N Credits est. / run” line, which is costed against today’s tracked keywords and enabled prompts.`]})}),_jsx(Step,{title:`Run it`,children:_jsxs(_components.p,{children:[`Click `,_jsx(_components.strong,{children:`Run now`}),` and confirm: “This runs immediately and will cost ~N Credits, debited from this company’s balance right away.”`]})}),_jsx(Step,{title:`Wait for the result`,children:_jsxs(_components.p,{children:[`The button reads `,_jsx(_components.strong,{children:`Running…`}),` until it finishes — up to a minute or two for AI Visibility — then you get a toast telling you the run succeeded or why it failed, and the card’s last-run line updates.`]})})]}),`\n`,_jsx(_components.p,{children:`Only one run per job can be in flight at a time; a second attempt is refused with “a run is already in progress for this job — try again once it finishes.” Manual runs are rate-limited per job over a short window, and the message tells you the allowance. A manual run also clears an automatic pause caused by repeated failures.`}),`\n`,_jsxs(_components.p,{children:[`When the latest run failed, the card offers `,_jsx(_components.strong,{children:`Retry`}),` instead — the same action, beside the error. For the full record, open `,_jsx(_components.strong,{children:`History`}),` and expand a job: each row shows `,_jsx(_components.strong,{children:`Succeeded`}),` or `,_jsx(_components.strong,{children:`Failed`}),`, a `,_jsx(_components.strong,{children:`Manual`}),` or `,_jsx(_components.strong,{children:`Scheduled`}),` badge, when it ran, what it cost in credits, and `,_jsx(_components.strong,{children:`Show error`}),` on failures. `,_jsx(_components.strong,{children:`Load more`}),` pages further back, 20 rows at a time and up to 100 per job. Jobs that have never run read “No runs recorded yet.”`]}),`\n`,_jsx(Heading,{level:`3`,id:`memory`,children:`Memory`}),`\n`,_jsx(_components.p,{children:`Project memory is what every agent working on this project knows about it. It is injected into every run on this project and never into another project’s work.`}),`\n`,_jsxs(_components.p,{children:[`Five sections carry the standing context — `,_jsx(_components.strong,{children:`Voice \u0026 Taste`}),`, `,_jsx(_components.strong,{children:`Audience`}),`, `,_jsx(_components.strong,{children:`What Works`}),`, `,_jsx(_components.strong,{children:`Constraints`}),` and `,_jsx(_components.strong,{children:`Open Threads`}),`. Click `,_jsx(_components.strong,{children:`Edit`}),` on one, write, and click `,_jsx(_components.strong,{children:`Save`}),`; saving locks that section so agents can’t rewrite it.`]}),`\n`,_jsxs(_components.p,{children:[`Below them, `,_jsx(_components.strong,{children:`Recorded facts`}),` are short dated notes, each with a kind pill (`,_jsx(_components.strong,{children:`Fact`}),`, `,_jsx(_components.strong,{children:`Preference`}),`, `,_jsx(_components.strong,{children:`Constraint`}),`, `,_jsx(_components.strong,{children:`Playbook`}),` or `,_jsx(_components.strong,{children:`In flight`}),`) and a line saying whether it was recorded by an agent or added by a person. Type into “Add a note every agent on this project should know…” and press Enter or click `,_jsx(_components.strong,{children:`Add`}),`. The `,_jsx(_components.strong,{children:`×`}),` on any note retires it, whether an agent or a person wrote it.`]}),`\n`,_jsxs(_components.p,{children:[`Editing needs `,_jsx(_components.strong,{children:`Manage company`}),`; everyone else reads. Agents have their own separate memories, and company-wide facts belong in `,_jsx(_components.a,{href:`/company-settings`,children:`Company settings`}),` — see `,_jsx(_components.a,{href:`/agents`,children:`Agents`}),` for how the three fit together.`]}),`\n`,_jsx(Heading,{level:`3`,id:`sign-ins`,children:`Sign-ins`}),`\n`,_jsx(_components.p,{children:`Some work needs an agent to be signed in to a client’s site. Saving a sign-in here captures the session once, so agents start already signed in and never see the password.`}),`\n`,_jsxs(Steps,{children:[_jsx(Step,{title:`Open a browser`,children:_jsxs(_components.p,{children:[`Go to `,_jsx(_components.strong,{children:`Settings → Sign-ins`}),` (admins only). Enter the `,_jsx(_components.strong,{children:`Sign-in page`}),` URL, for example `,_jsx(_components.code,{children:`https://example.com/wp-login.php`}),`, and click `,_jsx(_components.strong,{children:`Open a browser`}),`.`]})}),_jsx(Step,{title:`Sign in yourself`,children:_jsx(_components.p,{children:`Sign in inside the embedded browser, exactly as you would normally.`})}),_jsx(Step,{title:`Check the domain and save`,children:_jsxs(_components.p,{children:[`The `,_jsx(_components.strong,{children:`Domain`}),` field is prefilled from the URL and editable — make sure it matches where the site keeps you signed in. Click `,_jsx(_components.strong,{children:`Save this sign-in`}),`, or `,_jsx(_components.strong,{children:`Discard`}),` to throw it away. You then see “Saved — Agents working on this project can now use the sign-in.”`]})})]}),`\n`,_jsxs(_components.p,{children:[_jsx(_components.strong,{children:`Stored for this project`}),` lists each saved domain with its cookie count, expiry (or “session only”), and when it was last used. Expired entries offer `,_jsx(_components.strong,{children:`Sign in again`}),`, and the trash icon forgets one. Only the cookies for the domain you enter are saved, they are stored encrypted, and they are handed to an agent’s browser only while it works on this project.`]}),`\n`,_jsx(Warning,{children:_jsxs(_components.p,{children:[`Never put a real password into the `,_jsx(_components.strong,{children:`Login Email/Password`}),` columns of a `,_jsx(_components.a,{href:`/link-building`,children:`Link building`}),` import. Saved sign-ins are the right place for credentials.`]})}),`\n`,_jsx(Heading,{level:`2`,id:`archive-or-delete-a-project`,children:`Archive or delete a project`}),`\n`,_jsxs(_components.p,{children:[`Both live in the red-bordered `,_jsx(_components.strong,{children:`Manage`}),` card at the bottom of `,_jsx(_components.strong,{children:`Settings → General`}),`, and both need `,_jsx(_components.strong,{children:`Manage company`}),`.`]}),`\n`,_jsxs(Steps,{children:[_jsx(Step,{title:`Archive`,children:_jsxs(_components.p,{children:[`Click `,_jsx(_components.strong,{children:`Archive`}),`. The project disappears from the default Projects list but stays reachable through `,_jsx(_components.strong,{children:`Show archived`}),`, and the button becomes `,_jsx(_components.strong,{children:`Unarchive`}),`.`]})}),_jsx(Step,{title:`Unarchive`,children:_jsxs(_components.p,{children:[`Open the archived project and click `,_jsx(_components.strong,{children:`Unarchive`}),` to put it back in the active list.`]})}),_jsx(Step,{title:`Delete`,children:_jsxs(_components.p,{children:[`Click `,_jsx(_components.strong,{children:`Delete`}),`, read “Delete this project? — it will be permanently removed. This can’t be undone.”, and confirm with `,_jsx(_components.strong,{children:`Delete project`}),`. You return to the Projects list.`]})})]}),`\n`,_jsx(_components.p,{children:`Archived projects don’t count against your plan’s project allowance, and their schedules stop being Active. Deleting is permanent — archive instead if there is any chance you will want the history back.`})]})}function MDXContent(props={}){const{wrapper:MDXLayout}={..._provideComponents(),...props.components};return MDXLayout?_jsx(MDXLayout,{...props,children:_jsx(_createMdxContent,{...props})}):_createMdxContent(props)}return{default:MDXContent};function _missingMdxReference(id,component){throw new Error(`Expected `+(component?`component`:`object`)+\" `\"+id+\"` to be defined: you likely forgot to import, pass, or provide it.\")}","frontmatter":{},"scope":{"config":{},"pageMetadata":{"title":"Projects","description":"Create a project for a client site, finish its setup, and manage its pages, integrations, refresh schedules, memory and saved sign-ins.","href":"/projects"}}},"mdxSourceWithNoJs":null},"mdxExtracts":{"tableOfContents":[{"title":"The Projects page","slug":"the-projects-page","depth":2,"children":[]},{"title":"Creating a project","slug":"creating-a-project","depth":2,"children":[{"title":"Let AI write the description","slug":"let-ai-write-the-description","depth":3,"children":[]}]},{"title":"Your domain is a one-time setting","slug":"your-domain-is-a-one-time-setting","depth":2,"children":[]},{"title":"The project sidebar","slug":"the-project-sidebar","depth":2,"children":[]},{"title":"The project Overview","slug":"the-project-overview","depth":2,"children":[{"title":"The setup checklist","slug":"the-setup-checklist","depth":3,"children":[]}]},{"title":"Settings","slug":"settings","depth":2,"children":[{"title":"General","slug":"general","depth":3,"children":[]},{"title":"Features","slug":"features","depth":3,"children":[]},{"title":"Integrations","slug":"integrations","depth":3,"children":[]},{"title":"Schedules","slug":"schedules","depth":3,"children":[]},{"title":"Change a schedule","slug":"change-a-schedule","depth":4,"children":[]},{"title":"Run a check now","slug":"run-a-check-now","depth":4,"children":[]},{"title":"Memory","slug":"memory","depth":3,"children":[]},{"title":"Sign-ins","slug":"sign-ins","depth":3,"children":[]}]},{"title":"Archive or delete a project","slug":"archive-or-delete-a-project","depth":2,"children":[]}],"codeExamples":{}},"jsLinks":[],"subdomain":"doableteam-a944c448","siteName":"Visibility Docs","title":"Projects - Visibility Docs","navMaps":{"firstHrefInVersion":{},"firstHrefInLanguage":{}},"lastModified":"2026-09-09T04:05:59.980Z","originalFileLocation":"projects.mdx"},"headHtml":"\u003cscript data-mint-head>(function(){var d=document.documentElement,p=null;if(!p){try{p=localStorage.getItem(\"isDarkMode\")}catch(e){}if(p==='true')p='dark';else if(p==='false')p='light';if(p!=='light'\u0026\u0026p!=='dark'\u0026\u0026p!=='system')p=\"system\"}var r=p==='system'?(matchMedia(\"(prefers-color-scheme: dark)\").matches?'dark':'light'):p;d.classList.remove(r==='dark'?'light':'dark');d.classList.add(r);d.setAttribute(\"data-theme-preference\",p)})();\u003c/script>\u003cmeta data-mint-head name=\"description\" content=\"Create a project for a client site, finish its setup, and manage its pages, integrations, refresh schedules, memory and saved sign-ins.\">\u003cmeta data-mint-head name=\"application-name\" content=\"Visibility Docs\">\u003cmeta data-mint-head name=\"generator\" content=\"Mintlify\">\u003clink data-mint-head rel=\"icon\" type=\"image/png\" sizes=\"192x192\" href=\"/mintlify-assets/_mintlify/favicons/doableteam-a944c448/ppFUL9WdIUUntbf2/_generated/favicon/android-chrome-192x192.png\" media=\"(prefers-color-scheme: light)\">\u003clink data-mint-head rel=\"apple-touch-icon\" type=\"image/png\" sizes=\"180x180\" href=\"/mintlify-assets/_mintlify/favicons/doableteam-a944c448/ppFUL9WdIUUntbf2/_generated/favicon/apple-touch-icon.png\">\u003clink data-mint-head rel=\"icon\" type=\"image/png\" sizes=\"16x16\" href=\"/mintlify-assets/_mintlify/favicons/doableteam-a944c448/ppFUL9WdIUUntbf2/_generated/favicon/favicon-16x16.png\" media=\"(prefers-color-scheme: light)\">\u003clink data-mint-head rel=\"icon\" type=\"image/png\" sizes=\"32x32\" href=\"/mintlify-assets/_mintlify/favicons/doableteam-a944c448/ppFUL9WdIUUntbf2/_generated/favicon/favicon-32x32.png\" media=\"(prefers-color-scheme: light)\">\u003clink data-mint-head rel=\"shortcut icon\" type=\"image/x-icon\" href=\"/mintlify-assets/_mintlify/favicons/doableteam-a944c448/ppFUL9WdIUUntbf2/_generated/favicon/favicon.ico\" media=\"(prefers-color-scheme: light)\">\u003clink data-mint-head rel=\"icon\" type=\"image/png\" sizes=\"192x192\" href=\"/mintlify-assets/_mintlify/favicons/doableteam-a944c448/ppFUL9WdIUUntbf2/_generated/favicon-dark/android-chrome-192x192.png\" media=\"(prefers-color-scheme: dark)\">\u003clink data-mint-head rel=\"icon\" type=\"image/png\" sizes=\"16x16\" href=\"/mintlify-assets/_mintlify/favicons/doableteam-a944c448/ppFUL9WdIUUntbf2/_generated/favicon-dark/favicon-16x16.png\" media=\"(prefers-color-scheme: dark)\">\u003clink data-mint-head rel=\"icon\" type=\"image/png\" sizes=\"32x32\" href=\"/mintlify-assets/_mintlify/favicons/doableteam-a944c448/ppFUL9WdIUUntbf2/_generated/favicon-dark/favicon-32x32.png\" media=\"(prefers-color-scheme: dark)\">\u003clink data-mint-head rel=\"shortcut icon\" type=\"image/x-icon\" href=\"/mintlify-assets/_mintlify/favicons/doableteam-a944c448/ppFUL9WdIUUntbf2/_generated/favicon-dark/favicon.ico\" media=\"(prefers-color-scheme: dark)\">\u003cmeta data-mint-head property=\"og:title\" content=\"Projects - Visibility Docs\">\u003cmeta data-mint-head property=\"og:description\" content=\"Create a project for a client site, finish its setup, and manage its pages, integrations, refresh schedules, memory and saved sign-ins.\">\u003cmeta data-mint-head property=\"og:site_name\" content=\"Visibility Docs\">\u003cmeta data-mint-head property=\"og:url\" content=\"https://docs.visibility.so/projects\">\u003cmeta data-mint-head property=\"og:type\" content=\"website\">\u003cmeta data-mint-head name=\"twitter:card\" content=\"summary_large_image\">\u003cmeta data-mint-head name=\"twitter:title\" content=\"Projects - Visibility Docs\">\u003cmeta data-mint-head name=\"twitter:description\" content=\"Create a project for a client site, finish its setup, and manage its pages, integrations, refresh schedules, memory and saved sign-ins.\">\u003cmeta data-mint-head name=\"msapplication-config\" content=\"/mintlify-assets/_mintlify/favicons/doableteam-a944c448/ppFUL9WdIUUntbf2/_generated/favicon/browserconfig.xml\">\u003cmeta data-mint-head name=\"apple-mobile-web-app-title\" content=\"Visibility Docs\">\u003cmeta data-mint-head name=\"msapplication-TileColor\" content=\"#171717\">\u003clink data-mint-head rel=\"canonical\" href=\"https://docs.visibility.so/projects\">\u003clink data-mint-head rel=\"alternate\" type=\"application/xml\" href=\"/sitemap.xml\">\u003clink data-mint-head rel=\"alternate\" type=\"text/markdown\" href=\"/projects.md\">\u003cscript data-mint-head type=\"application/ld+json\">{\"@context\":\"https://schema.org\",\"@graph\":[{\"@type\":\"Organization\",\"@id\":\"https://docs.visibility.so/#organization\",\"name\":\"Visibility Docs\",\"url\":\"https://docs.visibility.so\",\"logo\":{\"@type\":\"ImageObject\",\"url\":\"https://mintcdn.com/doableteam-a944c448/yZxfxMRqwidNc6fj/logo/light.png?fit=max\u0026auto=format\u0026n=yZxfxMRqwidNc6fj\u0026q=85\u0026s=e1fd35ed3273f515f71eeea2dadf78bc\"}},{\"@type\":\"WebSite\",\"@id\":\"https://docs.visibility.so#website\",\"name\":\"Visibility Docs\",\"url\":\"https://docs.visibility.so\",\"publisher\":{\"@id\":\"https://docs.visibility.so/#organization\"}},{\"@type\":\"WebPage\",\"@id\":\"https://docs.visibility.so/projects#webpage\",\"url\":\"https://docs.visibility.so/projects\",\"name\":\"Projects\",\"description\":\"Create a project for a client site, finish its setup, and manage its pages, integrations, refresh schedules, memory and saved sign-ins.\",\"dateModified\":\"2026-09-09T04:05:59.980Z\",\"isPartOf\":{\"@id\":\"https://docs.visibility.so#website\"},\"breadcrumb\":{\"@id\":\"https://docs.visibility.so/projects#breadcrumb\"}},{\"@type\":\"BreadcrumbList\",\"@id\":\"https://docs.visibility.so/projects#breadcrumb\",\"itemListElement\":[{\"@type\":\"ListItem\",\"position\":1,\"name\":\"Visibility Docs\",\"item\":\"https://docs.visibility.so\"},{\"@type\":\"ListItem\",\"position\":2,\"name\":\"Projects\",\"item\":\"https://docs.visibility.so/projects\"}]},{\"@type\":[\"Article\",\"TechArticle\"],\"@id\":\"https://docs.visibility.so/projects#article\",\"headline\":\"Projects\",\"name\":\"Projects\",\"description\":\"Create a project for a client site, finish its setup, and manage its pages, integrations, refresh schedules, memory and saved sign-ins.\",\"url\":\"https://docs.visibility.so/projects\",\"mainEntityOfPage\":{\"@id\":\"https://docs.visibility.so/projects#webpage\"},\"dateModified\":\"2026-09-09T04:05:59.980Z\",\"publisher\":{\"@id\":\"https://docs.visibility.so/#organization\"},\"isPartOf\":{\"@id\":\"https://docs.visibility.so#website\"}}]}\u003c/script>\u003cscript data-mint-head type=\"application/ld+json\">{\"@context\":\"https://schema.org\",\"@type\":\"WebSite\",\"name\":\"Visibility Docs\",\"creator\":{\"@type\":\"Organization\",\"name\":\"Mintlify\",\"url\":\"https://mintlify.com\"}}\u003c/script>","siteName":"Visibility Docs","nav":{"global":null,"tabs":[{"tab":"Documentation","icon":"book-open","groups":[{"group":"Getting started","pages":[{"title":"Introduction","href":"/introduction"},{"title":"Getting started","href":"/getting-started"},{"title":"Navigating the app","href":"/navigating-the-app"}]},{"group":"Agents \u0026 work","pages":[{"title":"Agents","href":"/agents"},{"title":"Tasks","href":"/tasks"},{"title":"Chat","href":"/chat"},{"title":"Inbox and approvals","description":"Read and clear the notifications your agents and tasks generate, and approve or reject the two decisions Visibility asks you to make — agent hires and WordPress publishes.","href":"/inbox-and-approvals"}]},{"group":"Projects \u0026 SEO","pages":[{"title":"Projects","href":"/projects"},{"title":"SEO features","description":"The reporting suite inside every project — keyword rankings, AI Visibility, organic traffic, opportunities and custom dashboards — and the schedules that keep them fresh.","href":"/seo-features"},{"title":"Keyword rankings","href":"/keyword-rankings"},{"title":"AI Visibility","href":"/ai-visibility"},{"title":"Organic traffic","href":"/organic-traffic"},{"title":"Opportunities","href":"/opportunities"},{"title":"Custom dashboards","href":"/dashboards"},{"title":"Content and WordPress","href":"/content-and-wordpress"},{"title":"Link building","href":"/link-building"}]},{"group":"Team \u0026 company","pages":[{"title":"Team management","href":"/team-management"},{"title":"Company settings","href":"/company-settings"},{"title":"Your account","href":"/account"}]},{"group":"Billing","pages":[{"title":"Billing and subscriptions","href":"/billing-and-subscriptions"},{"title":"Credits and BYOK","href":"/credits-and-byok"}]},{"group":"Configuration","pages":[{"title":"Integrations","href":"/integrations"}]}]},{"tab":"Changelog","icon":"megaphone","pages":[{"title":"Changelog","href":"/changelog"}]},{"tab":"FAQ","icon":"circle-question","pages":[{"title":"FAQ","href":"/faq"}]}]},"title":"Projects - Visibility Docs","buildId":"dpl_CUnGQP1HgFUzoxatVC37y4zP83Vx","deploymentId":"dpl_CUnGQP1HgFUzoxatVC37y4zP83Vx","dynamics":["07c022d89b","a74be98ba7"],"chunks":["Frame-BCFzRGe_.js","DynamicMarkdown-BUuAYxJE.js","zoom-image-lightbox-DQ5W4Q2v.js","PlusIcon-jZ8vgk6R.js","lightbox-handle-r17bVUz3.js"]}