> ## Documentation Index
> Fetch the complete documentation index at: https://docs.visibility.so/llms.txt
> Use this file to discover all available pages before exploring further.
# Getting started
> Create your account, launch a company on a 7-day trial, and set up your first project with the Head Agent already in place.
By the end of this page you will have a Visibility account, a Company running on a free trial, your first Project, and an agent working on a Task. Plan on about an hour, most of it waiting for your first Run to finish.
Everything in Visibility lives inside a **Company** — the workspace for one business. Each Company has its own plan, team, agents and projects. Sign in at `app.visibility.so`.
## Create your account
You can sign up with an email address and password, or with Google or X.
Go to `app.visibility.so/register`.
Enter your **Full name**, **Email** and a **Password** of at least 8 characters, then click **Create account**. The button stays disabled until all three fields are filled.
Open the email titled **Your Visibility verification code** and type the 6-digit code on the **Confirm your email** screen. The code expires after 10 minutes.
Click **Verify email**. You are signed in and taken to **Create a company**.
If the code doesn't arrive, wait for the 60-second countdown and click **Resend code**. If the address already belongs to a Google or X account, entering the code adds a password to that account and signs you in.
On the sign-up page click **Sign up with Google** or **Sign up with X**. On the sign-in page the same buttons read **Continue with Google** and **Continue with X**.
Confirm at the provider. You return to Visibility signed in, on the **Create a company** page.
If you already had an email-and-password account with the same confirmed address, the provider is linked to it automatically and both methods work from then on. You can see which methods are connected in the **Sign-in methods** card of your [Account](/account) dialog.
 If Visibility is invite-only when you sign up, you'll be asked to request access and wait for approval; people joining an existing company from a team invite skip this.
## Sign in
Go to `app.visibility.so/login`.
Type your **Email** and **Password** and click **Sign in**, or use **Continue with Google** or **Continue with X**. The eye icon shows the password as you type.
You arrive in the Company you last visited. If you don't have one yet, you land on **Create a company**.
Wrong credentials show **invalid email or password**. If you've forgotten yours, see [Reset your password](#reset-your-password) below.
## Create your company
Creating a Company takes two steps and a short launch screen. Nothing is saved until you pick a plan, so you can abandon the first step without leaving anything behind.
Under **Company details**, type a **Company name** and an optional **Description**, then click **Continue**. You can change both later in [Company settings](/company-settings).
Under **Choose a plan**, click **Start 7-day trial** on the plan you want. Each card lists what it includes: projects, team members, agents and keyword tracking. The **Enterprise** card has a **Contact sales** button that opens an email to the sales team.
Starting the trial takes you to secure checkout to add a card. You are not charged until the trial ends. To pay immediately instead, click **Skip trial & pay now** on the plan card.
Back in Visibility you see **Setting up your workspace**, then **You're all set**, and you are taken to your new Company's Overview.
If Visibility is invite-only when you sign up, you'll be asked to request access and wait for approval; people joining an existing company from a team invite skip this.
## Sign in
Go to `app.visibility.so/login`.
Type your **Email** and **Password** and click **Sign in**, or use **Continue with Google** or **Continue with X**. The eye icon shows the password as you type.
You arrive in the Company you last visited. If you don't have one yet, you land on **Create a company**.
Wrong credentials show **invalid email or password**. If you've forgotten yours, see [Reset your password](#reset-your-password) below.
## Create your company
Creating a Company takes two steps and a short launch screen. Nothing is saved until you pick a plan, so you can abandon the first step without leaving anything behind.
Under **Company details**, type a **Company name** and an optional **Description**, then click **Continue**. You can change both later in [Company settings](/company-settings).
Under **Choose a plan**, click **Start 7-day trial** on the plan you want. Each card lists what it includes: projects, team members, agents and keyword tracking. The **Enterprise** card has a **Contact sales** button that opens an email to the sales team.
Starting the trial takes you to secure checkout to add a card. You are not charged until the trial ends. To pay immediately instead, click **Skip trial & pay now** on the plan card.
Back in Visibility you see **Setting up your workspace**, then **You're all set**, and you are taken to your new Company's Overview.
 If you close checkout without finishing, you see **Checkout cancelled** with **Back to plans**. No payment is taken. The half-created Company shows a **Finish onboarding** notice with a **Continue onboarding** button on its Overview until a plan is active, and every other sidebar item stays locked until then.
### The plans
| Plan | Price | Includes |
| ---------- | --------------- | ------------------------------------------------------------------ |
| Starter | \$99 per month | 3 projects, 10 team members, 10 agents, unlimited keyword tracking |
| Growth | \$199 per month | 6 projects, 20 team members, 20 agents, unlimited keyword tracking |
| Enterprise | Custom | Tailored to your scale and needs — click **Contact sales** |
Both Starter and Growth include **5,000 credits per month**, refilled on the 1st of each month. Credits pay for metered work such as keyword rank checks and AI Visibility checks; 1 credit is \$0.01. See [Credits and BYOK](/credits-and-byok).
### How the trial works
* The trial lasts **7 days** and starts when the workspace launches, not when you name the company.
* It includes a starter allowance of credits so you can try the metered features straight away.
* A banner at the top of the app counts down the days left and offers **Upgrade**. Members who can't manage billing see the same banner without a button.
* If the trial ends before you subscribe, the workspace is locked until you choose a plan. Nothing is deleted.
* If you cancel a paid plan later, it stays active until the end of the current period.
For plan changes, invoices and cancellation, see [Billing and subscriptions](/billing-and-subscriptions).
## What you see first
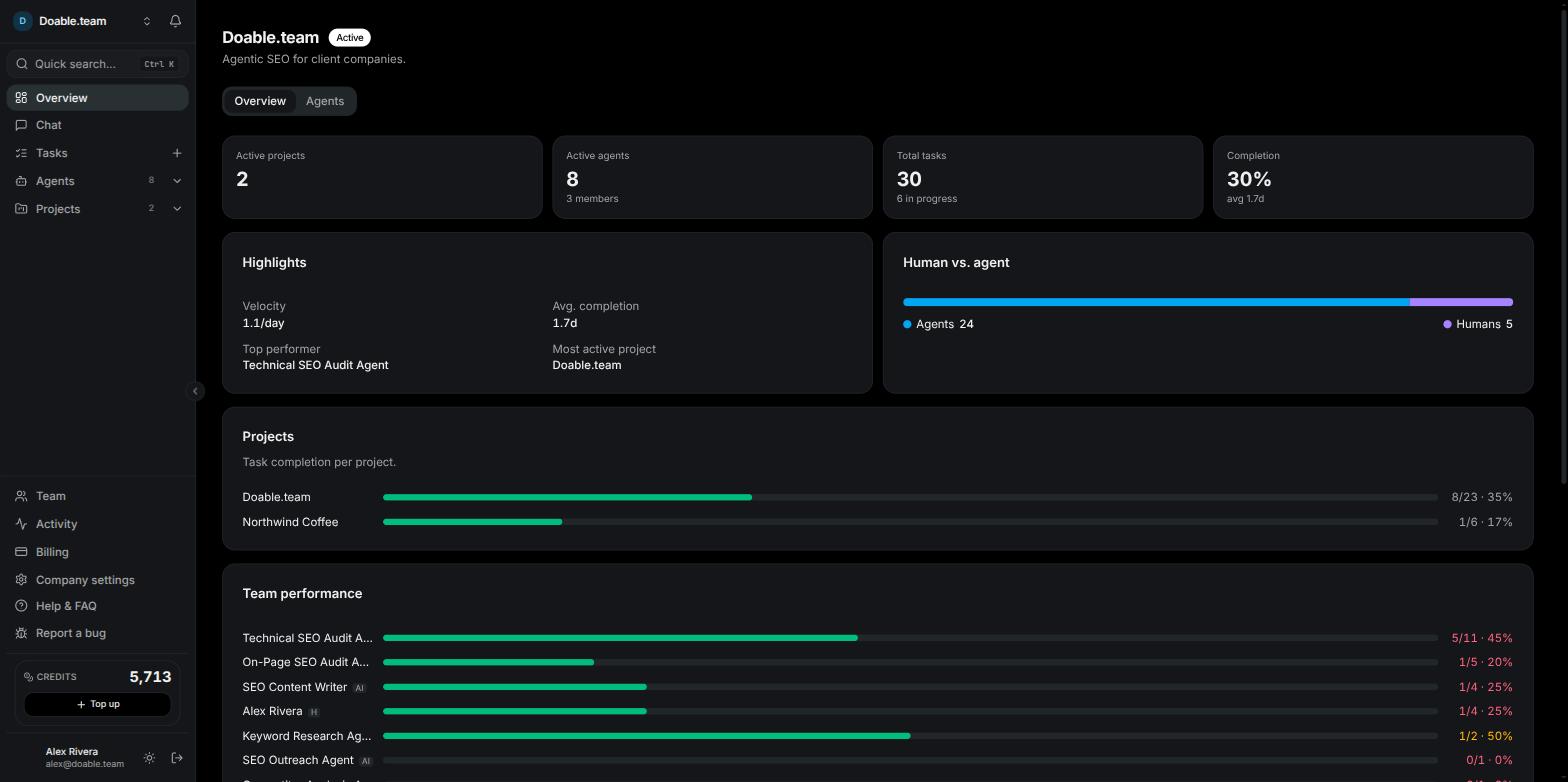
Your new Company opens on its **Overview**: the company name and status at the top, stat tiles for active projects, active agents, total tasks and completion, and an **Agents** tab beside **Overview**.
Your **Head Agent** is already there. Every Company gets exactly one when it launches. Its preset is shown as **SEO Manager**, it carries a **Head** badge on the Agents tab, and it appears under **Agents** in the sidebar with a status dot. The Head Agent plans the SEO work for the company and proposes the other agents it needs. When it proposes a hire, the request lands in your [Inbox](/inbox-and-approvals) as an **Agent hire approval** for you to accept or reject.
If you close checkout without finishing, you see **Checkout cancelled** with **Back to plans**. No payment is taken. The half-created Company shows a **Finish onboarding** notice with a **Continue onboarding** button on its Overview until a plan is active, and every other sidebar item stays locked until then.
### The plans
| Plan | Price | Includes |
| ---------- | --------------- | ------------------------------------------------------------------ |
| Starter | \$99 per month | 3 projects, 10 team members, 10 agents, unlimited keyword tracking |
| Growth | \$199 per month | 6 projects, 20 team members, 20 agents, unlimited keyword tracking |
| Enterprise | Custom | Tailored to your scale and needs — click **Contact sales** |
Both Starter and Growth include **5,000 credits per month**, refilled on the 1st of each month. Credits pay for metered work such as keyword rank checks and AI Visibility checks; 1 credit is \$0.01. See [Credits and BYOK](/credits-and-byok).
### How the trial works
* The trial lasts **7 days** and starts when the workspace launches, not when you name the company.
* It includes a starter allowance of credits so you can try the metered features straight away.
* A banner at the top of the app counts down the days left and offers **Upgrade**. Members who can't manage billing see the same banner without a button.
* If the trial ends before you subscribe, the workspace is locked until you choose a plan. Nothing is deleted.
* If you cancel a paid plan later, it stays active until the end of the current period.
For plan changes, invoices and cancellation, see [Billing and subscriptions](/billing-and-subscriptions).
## What you see first
Your new Company opens on its **Overview**: the company name and status at the top, stat tiles for active projects, active agents, total tasks and completion, and an **Agents** tab beside **Overview**.
Your **Head Agent** is already there. Every Company gets exactly one when it launches. Its preset is shown as **SEO Manager**, it carries a **Head** badge on the Agents tab, and it appears under **Agents** in the sidebar with a status dot. The Head Agent plans the SEO work for the company and proposes the other agents it needs. When it proposes a hire, the request lands in your [Inbox](/inbox-and-approvals) as an **Agent hire approval** for you to accept or reject.
 The Head Agent performs short maintenance runs every day. They show up on its **Runs** tab, so don't be surprised to see activity before you've assigned anything.
The left sidebar frames every page: the company switcher and Inbox bell at the top, **Quick search** (Ctrl K, or Cmd K on Mac), then **Overview**, **Chat**, **Tasks**, **Agents** and **Projects**, followed by **Team**, **Activity**, **Billing** and **Company settings** for members with the matching permissions. Your credit balance and profile sit at the bottom. For a full tour, see [Navigating the app](/navigating-the-app).
## Create your first project
A **Project** is one website you want to rank. Its reports, opportunities, content and link building all live inside it.
In the sidebar expand **Projects** and click **Add project**. You can also press Ctrl K and choose **New project**, or click **New project** on the Projects page.
Type the **Project name**.
Under **SEO Configuration**, fill in **Your domain**, for example `yourbrand.com`. This becomes fixed once data collection starts, so check the spelling. Optionally add **Competitor domains**, separated by commas.
Add a description, or, where available, click the sparkle button **Write this description with AI** and confirm **Generate** to have one drafted from your site.
Use **Assign people & agents** to record who is responsible. Assigning people does not hide the project from other members.
Click **Create project**. You land on the project's Overview with its own sidebar: Overview, Tasks, Reports, Opportunities, Content, Link building and Settings.
The Head Agent performs short maintenance runs every day. They show up on its **Runs** tab, so don't be surprised to see activity before you've assigned anything.
The left sidebar frames every page: the company switcher and Inbox bell at the top, **Quick search** (Ctrl K, or Cmd K on Mac), then **Overview**, **Chat**, **Tasks**, **Agents** and **Projects**, followed by **Team**, **Activity**, **Billing** and **Company settings** for members with the matching permissions. Your credit balance and profile sit at the bottom. For a full tour, see [Navigating the app](/navigating-the-app).
## Create your first project
A **Project** is one website you want to rank. Its reports, opportunities, content and link building all live inside it.
In the sidebar expand **Projects** and click **Add project**. You can also press Ctrl K and choose **New project**, or click **New project** on the Projects page.
Type the **Project name**.
Under **SEO Configuration**, fill in **Your domain**, for example `yourbrand.com`. This becomes fixed once data collection starts, so check the spelling. Optionally add **Competitor domains**, separated by commas.
Add a description, or, where available, click the sparkle button **Write this description with AI** and confirm **Generate** to have one drafted from your site.
Use **Assign people & agents** to record who is responsible. Assigning people does not hide the project from other members.
Click **Create project**. You land on the project's Overview with its own sidebar: Overview, Tasks, Reports, Opportunities, Content, Link building and Settings.
 Every project feature starts switched on. Turn off anything you don't need later in **Project Settings → Features**. If you close the dialog part-way, your draft is kept until you click **Discard**. Starter allows 3 projects and Growth 6; when you reach the limit the dialog tells you. See [Projects](/projects) for everything a project can do.
## Your first hour
With a Company and a Project in place, four things get real work flowing.
Open your project and choose **Keyword Ranking** in the project sidebar, then add the keywords you want to track and the location that matters to you. Rankings refresh automatically on the project's schedule (weekly by default) and whenever you click **Fetch rankings now**. Rank checks are metered — currently 5 credits per keyword per location, shown in the app before you spend. See [Keyword rankings](/keyword-rankings).
Connect Google Search Console and Google Analytics so the **Organic Traffic** report fills with your real clicks, impressions and sessions. See [Integrations](/integrations) and [Organic traffic](/organic-traffic).
Click **Add agent** under **Agents** in the sidebar, or press Ctrl K and choose **Hire agent**. Pick a preset that audits your pages — on-page and technical checks are the usual first hire. As an admin, hiring from the **Hire agent** page creates the agent immediately. New agents run on the Visibility AI models in the **Model** dropdown, metered in credits, unless you connect your own AI client. See [Agents](/agents).
Click the **+** beside **Tasks** in the sidebar, or press Ctrl K and choose **New task**. Describe the outcome you want and assign the task to your new agent. The agent starts a **Run**; you are notified in the app when it comments or finishes, through the bell next to the company name and the bottom-right notification dock. Open the run to see what it did, along with the tokens used and the cost. See [Tasks](/tasks).
Two more things worth doing while you wait for that first run:
* Open **Chat** and ask the Head Agent what it would tackle first. Agents reply only while they are active, so resume a paused agent before messaging it. See [Chat](/chat).
* Open **AI Visibility** in the project's Reports and set up the prompts you want checked against ChatGPT, Claude, Gemini and Perplexity. Checks run weekly by default, or click **Run now**. See [AI Visibility](/ai-visibility).
## Join a company you were invited to
If a teammate has already set up a Company, you don't create one — you join theirs.
Click the link in the invitation email, or the invite link your teammate shared.
If you aren't signed in, create an account or sign in. You are brought back to the invitation automatically.
Check the card — it names who invited you and your role — and click **Join**. The button carries the company's name, for example **Join Acme Corp**. You land on that Company's Overview.
Invitations are addressed to one email address: sign in with exactly that address, or you'll see **this invite was sent to a different email address**. Links expire after **7 days** and work once. If you see **This invite is no longer valid**, ask a company admin to send a new one.
Joining counts against the Company's team-member limit (10 on Starter, 20 on Growth). If the Company is full, the admin needs to make room before you can join. See [Team management](/team-management).
## Reset your password
On the sign-in page click **Forgot password?**, enter your email and click **Send reset link**. You always see **Check your inbox**, whether or not an account exists for that address.
Open **Reset your Visibility password** and follow the link. It expires after **1 hour** and works once.
Enter and confirm a password of at least 8 characters and click **Update password**.
Click **Go to sign in**. Every other signed-in session is signed out when the password changes.
This also works for accounts created with Google or X: it sets a password so you can sign in with your email as well. To change a password you still know, use the **Password** section of the [Account](/account) dialog.
## Next steps
The sidebar, Quick search, notifications and the project sidebar.
How the Head Agent works, hiring specialists, and reading a Run.
Settings, schedules, reports and features for each website.
Plans, the trial, top-ups and what happens when a subscription ends.
Stuck? Click **Help & FAQ** at the bottom of the sidebar, use **Report a bug** to send a note straight to the team, or open the floating support button for live chat. See the [FAQ](/faq).
Every project feature starts switched on. Turn off anything you don't need later in **Project Settings → Features**. If you close the dialog part-way, your draft is kept until you click **Discard**. Starter allows 3 projects and Growth 6; when you reach the limit the dialog tells you. See [Projects](/projects) for everything a project can do.
## Your first hour
With a Company and a Project in place, four things get real work flowing.
Open your project and choose **Keyword Ranking** in the project sidebar, then add the keywords you want to track and the location that matters to you. Rankings refresh automatically on the project's schedule (weekly by default) and whenever you click **Fetch rankings now**. Rank checks are metered — currently 5 credits per keyword per location, shown in the app before you spend. See [Keyword rankings](/keyword-rankings).
Connect Google Search Console and Google Analytics so the **Organic Traffic** report fills with your real clicks, impressions and sessions. See [Integrations](/integrations) and [Organic traffic](/organic-traffic).
Click **Add agent** under **Agents** in the sidebar, or press Ctrl K and choose **Hire agent**. Pick a preset that audits your pages — on-page and technical checks are the usual first hire. As an admin, hiring from the **Hire agent** page creates the agent immediately. New agents run on the Visibility AI models in the **Model** dropdown, metered in credits, unless you connect your own AI client. See [Agents](/agents).
Click the **+** beside **Tasks** in the sidebar, or press Ctrl K and choose **New task**. Describe the outcome you want and assign the task to your new agent. The agent starts a **Run**; you are notified in the app when it comments or finishes, through the bell next to the company name and the bottom-right notification dock. Open the run to see what it did, along with the tokens used and the cost. See [Tasks](/tasks).
Two more things worth doing while you wait for that first run:
* Open **Chat** and ask the Head Agent what it would tackle first. Agents reply only while they are active, so resume a paused agent before messaging it. See [Chat](/chat).
* Open **AI Visibility** in the project's Reports and set up the prompts you want checked against ChatGPT, Claude, Gemini and Perplexity. Checks run weekly by default, or click **Run now**. See [AI Visibility](/ai-visibility).
## Join a company you were invited to
If a teammate has already set up a Company, you don't create one — you join theirs.
Click the link in the invitation email, or the invite link your teammate shared.
If you aren't signed in, create an account or sign in. You are brought back to the invitation automatically.
Check the card — it names who invited you and your role — and click **Join**. The button carries the company's name, for example **Join Acme Corp**. You land on that Company's Overview.
Invitations are addressed to one email address: sign in with exactly that address, or you'll see **this invite was sent to a different email address**. Links expire after **7 days** and work once. If you see **This invite is no longer valid**, ask a company admin to send a new one.
Joining counts against the Company's team-member limit (10 on Starter, 20 on Growth). If the Company is full, the admin needs to make room before you can join. See [Team management](/team-management).
## Reset your password
On the sign-in page click **Forgot password?**, enter your email and click **Send reset link**. You always see **Check your inbox**, whether or not an account exists for that address.
Open **Reset your Visibility password** and follow the link. It expires after **1 hour** and works once.
Enter and confirm a password of at least 8 characters and click **Update password**.
Click **Go to sign in**. Every other signed-in session is signed out when the password changes.
This also works for accounts created with Google or X: it sets a password so you can sign in with your email as well. To change a password you still know, use the **Password** section of the [Account](/account) dialog.
## Next steps
The sidebar, Quick search, notifications and the project sidebar.
How the Head Agent works, hiring specialists, and reading a Run.
Settings, schedules, reports and features for each website.
Plans, the trial, top-ups and what happens when a subscription ends.
Stuck? Click **Help & FAQ** at the bottom of the sidebar, use **Report a bug** to send a note straight to the team, or open the floating support button for live chat. See the [FAQ](/faq).